Magento is currently the largest open-source eCommerce platform in the world. Due to its feature rich and extensible code base, merchants with large and small operations all around the world have been using it for a wide variety of projects.
Magento 1 has been around for eight years, and its successor, Magento 2, was released at the end of 2015, improving weak points of the earlier version such as:
- Improved performance
- Official automated test suite
- Better back-end UI
- New, more modern front-end codebase
- A more modular way to develop modules, with files contained inside the Magento code instead of being scattered all over the place
- Reduced number of conflicts between modules trying to customize the same functionality
A little over one year down the road, and the improvement is visible, even though not all of the problems mentioned have been totally solved. Now it’s completely safe to say that Magento 2 is a much more robust piece of software than its predecessor. Some of the improvements present in Magento 2 are:
- Unit and integration tests, including an official and documented way to create them for custom modules
- Modules that are really modularized, having all of their files placed under one single directory
- A richer templating system, allowing the theme developer to create an n-level template hierarchy
- A series of useful design patterns adopted throughout the code, improving the code quality and decreasing probability of errors created by modules—These include automatic dependency injection, service contracts, repositories, and factories, to name a few.
- Native integration to Varnish as a full page caching system, as well as Redis for session and cache handling
- PHP 7 support
The learning curve for Magento 2, with all of these changes, has become even steeper. In this guide, I intend to show you how to develop your first Magento 2 module, and point you in the right direction to continue your studies. Let’s get to it!
Magento 2 Tutorial Prerequisites
It is important that you have a good understanding of the following technologies/concepts in order to follow the rest of this article:
- Object-oriented Programming (OOP)
- PHP
- Namespaces
- MySQL
- Basic bash usage
From all of the above, OOP is probably the most important one. Magento was initially created by a team of experienced Java developers, and their legacy can certainly be seen throughout the codebase. In case you are not very confident about your OOP skills, it might be a good idea to review it before beginning your work with the platform.
Overview of Magento 2’s Architecture
Magento’s architecture was designed with the intent of making the source code as modularized and extensible as possible. The end goal of that approach is to allow it to be easily adapted and customized according to each project’s needs.
Customizing usually means changing the behavior of the platform’s code. In the majority of systems, this means changing the “core” code. In Magento, if you are following best practices, this is something you can avoid most of the time, making it possible for a store to keep up to date with the latest security patches and feature releases in a reliable fashion.
Magento 2 is a Model View ViewModel (MVVM) system. While being closely related to its sibling Model View Controller (MVC), an MVVM architecture provides a more robust separation between the Model and the View layers. Below is an explanation of each of the layers of a MVVM system:
- The Model holds the business logic of the application, and depends on an associated class—the ResourceModel—for database access. Models rely on service contracts to expose their functionality to the other layers of the application.
- The View is the structure and layout of what a user sees on a screen - the actual HTML. This is achieved in the PHTML files distributed with modules. PHTML files are associated to each ViewModel in the Layout XML files, which would be referred to as binders in the MVVM dialect. The layout files might also assign JavaScript files to be used in the final page.
- The ViewModel interacts with the Model layer, exposing only the necessary information to the View layer. In Magento 2, this is handled by the module’s Block classes. Note that this was usually part of the Controller role of an MVC system. On MVVM, the controller is only responsible for handling the user flow, meaning that it receives requests and either tells the system to render a view or to redirect the user to another route.
A Magento 2 module consists of some, if not all, elements of the architecture described above. The overall architecture is described below (source):
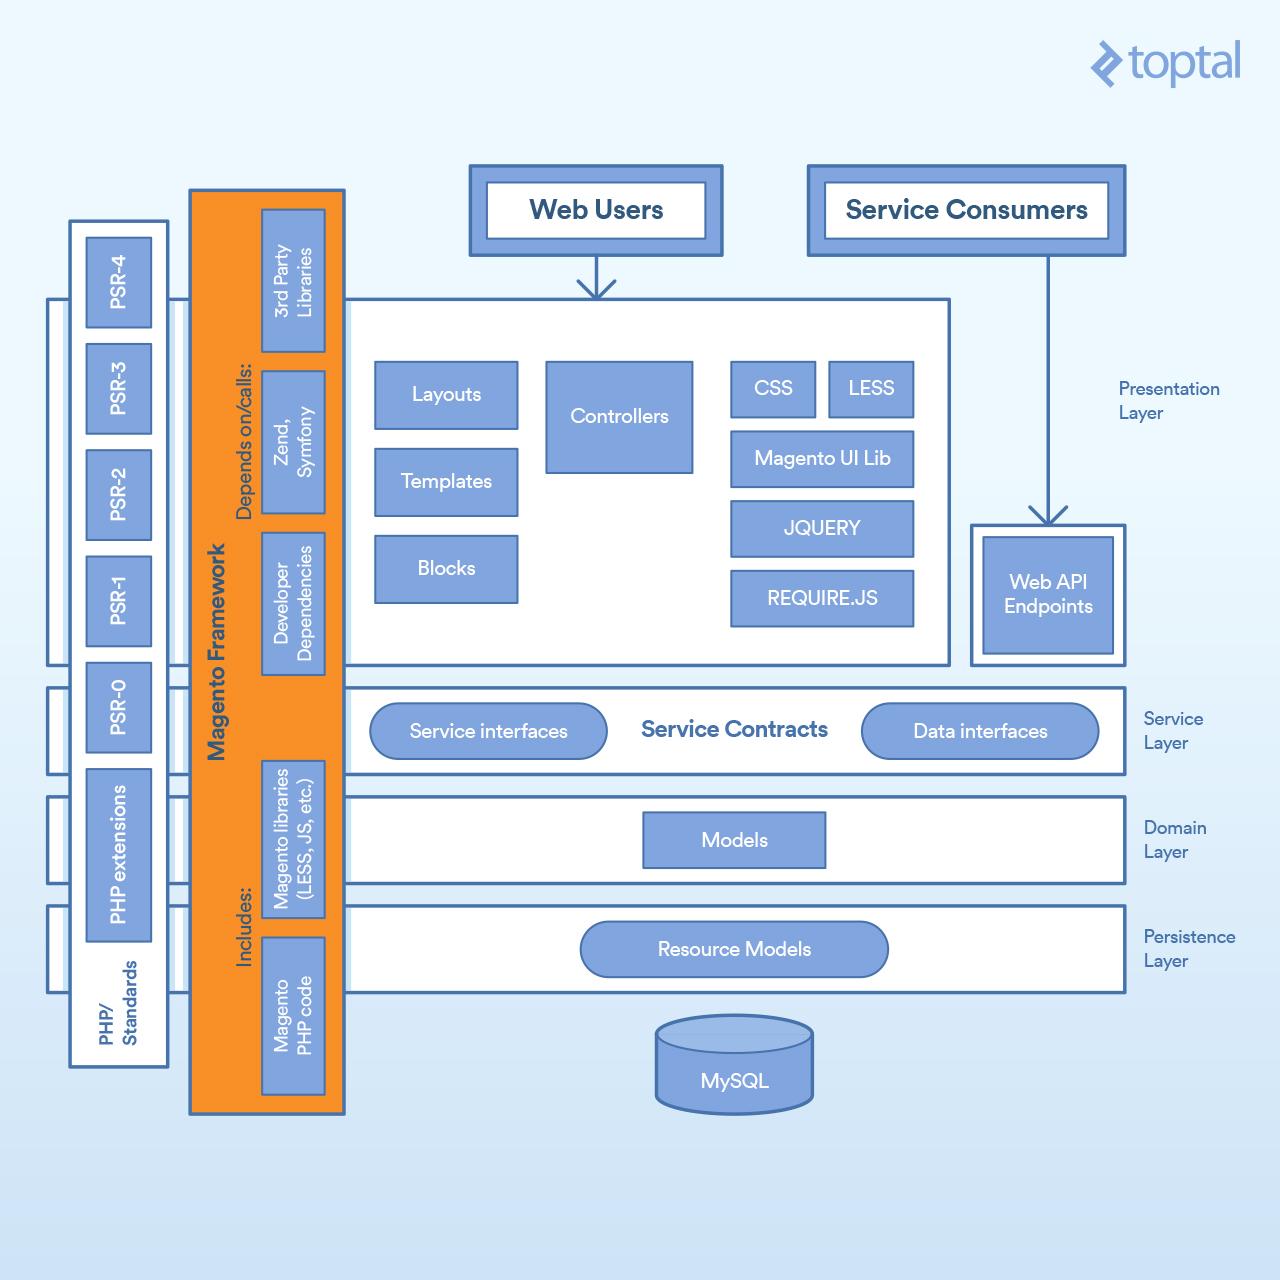
A Magento 2 module can in turn define external dependencies by using Composer, PHP’s dependency manager. In the diagram above, you see that the Magento 2 core modules depend on the Zend Framework, Symfony as well as other third-party libraries.
Below is the structure of Magento/Cms, a Magento 2 core module responsible for handling the creation of pages and static blocks.
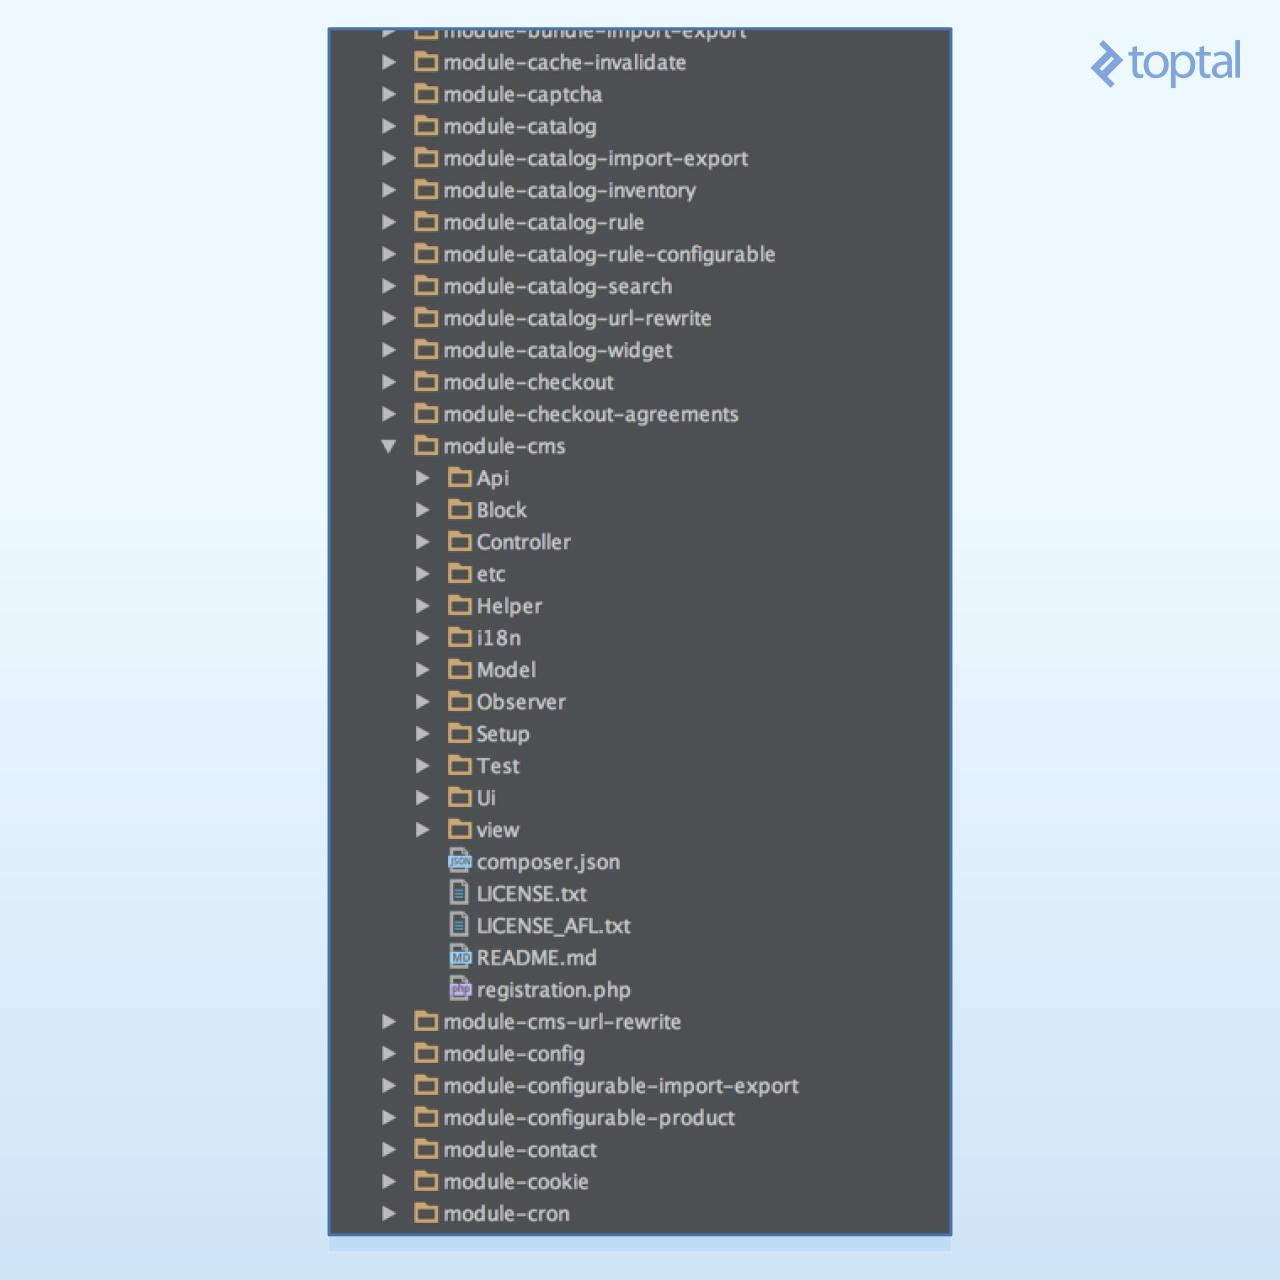
Each folder holds one part of the architecture, as follows:
- Api: Service contracts, defining service interfaces and data interfaces
- Block: The ViewModels of our MVVM architecture
- Controller: Controllers, responsible for handling the user’s flow while interacting with the system
- etc: Configuration XML files—The module defines itself and its parts (routes, models, blocks, observers, and cron jobs) within this folder. The etc files can also be used by non-core modules to override the functionality of core modules.
- Helper: Helper classes that hold code used in more than one application layer. For example, in the Cms module, helper classes are responsible for preparing HTML for presentation to the browser.
- i18n: Holds internationalization CSV files, used for translation
- Model: For Models and ResourceModels
- Observer: Holds Observers, or Models which are “observing” system events. Usually, when such an event is fired, the observer instantiates a Model to handle the necessary business logic for such an event.
- Setup: Migration classes, responsible for schema and data creation
- Test: Unit tests
- Ui: UI elements such as grids and forms used in the admin application
- view: Layout (XML) files and template (PHTML) files for the front-end and admin application
It is also interesting to notice that, in practice, all of Magento 2’s inner workings live inside a module. In the image above, you can see, for instance,
Magento_Checkout, responsible for the checkout process, and Magento_Catalog, responsible for the handling of products and categories. Basically, what this tells us is that learning how to work with modules is the most important part of becoming a Magento 2 developer.
All right, after this relatively brief introduction to the system architecture and module structure, let’s do something more concrete, shall we? Next, we will go through the traditional Weblog tutorial in order to get you comfortable with Magento 2 and on track to become a Magento 2 Developer. Before that, we need to set up a development environment. Let’s get to it!
Setting up the Magento 2 Module Development Environment
At the time of this writing, we were able to use the official Magento 2 DevBox, which is a Magento 2 Docker container. Docker on macOS is something I still consider to be unusable, at least with a system which heavily depends on fast disk I/O such as Magento 2. So, we will do it the traditional way: Install all packages natively on our own machine.
Setting up the Server
Installing everything surely is a bit more tedious, but the end result will be a lightning-fast Magento development environment. Believe me, you will save hours of work by not depending on Docker for your Magento 2 development.
This tutorial assumes an environment on macOS with Brew installed on it. If that’s not the case for you, the basics will remain the same, changing only the way you install the packages. Let’s start with installing all of the packages:
brew install mysql nginxb php70 php70-imagick php70-intl php70-mcrypt
Then start the services:
brew services start mysql
brew services start php70
sudo brew services start nginx
Ok, now we’ll point a domain to our loopback address. Open the hosts file in any editor, but make sure you have superuser permissions. Doing that with Vim would be:
sudo vim /etc/hosts
Then add the following line:
127.0.0.1 magento2.dev
Now we’ll create a vhost in Nginx:
vim /usr/local/etc/nginx/sites-available/magento2dev.conf
Add the following content:
server {
  listen 80;

  server_name magento2.dev;

  set $MAGE_ROOT /Users/yourusername/www/magento2dev;
  set $MAGE_MODE developer;


  # Default magento Nginx config starts below
  root $MAGE_ROOT/pub;
  index index.php;
  autoindex off;
  charset off;

  add_header 'X-Content-Type-Options' 'nosniff';
  add_header 'X-XSS-Protection' '1; mode=block';

  location / {
    try_files $uri $uri/ /index.php?$args;
  }

  location /pub {
    location ~ ^/pub/media/(downloadable|customer|import|theme_customization/.*\.xml) {
      deny all;
    }
    alias $MAGE_ROOT/pub;
    add_header X-Frame-Options "SAMEORIGIN";
  }

  location /static/ {
    if ($MAGE_MODE = "production") {
      expires max;
    }

    location ~* \.(ico|jpg|jpeg|png|gif|svg|js|css|swf|eot|ttf|otf|woff|woff2)$ {
      add_header Cache-Control "public";
      add_header X-Frame-Options "SAMEORIGIN";
      expires +1y;

      if (!-f $request_filename) {
        rewrite ^/static/(version\d*/)?(.*)$ /static.php?resource=$2 last;
      }
    }

    location ~* \.(zip|gz|gzip|bz2|csv|xml)$ {
      add_header Cache-Control "no-store";
      add_header X-Frame-Options "SAMEORIGIN";
      expires off;

      if (!-f $request_filename) {
        rewrite ^/static/(version\d*/)?(.*)$ /static.php?resource=$2 last;
      }
    }

    if (!-f $request_filename) {
      rewrite ^/static/(version\d*/)?(.*)$ /static.php?resource=$2 last;
    }

    add_header X-Frame-Options "SAMEORIGIN";
  }

  location /media/ {
    try_files $uri $uri/ /get.php?$args;

    location ~ ^/media/theme_customization/.*\.xml {
      deny all;
    }

    location ~* \.(ico|jpg|jpeg|png|gif|svg|js|css|swf|eot|ttf|otf|woff|woff2)$ {
      add_header Cache-Control "public";
      add_header X-Frame-Options "SAMEORIGIN";
      expires +1y;
      try_files $uri $uri/ /get.php?$args;
    }

    location ~* \.(zip|gz|gzip|bz2|csv|xml)$ {
      add_header Cache-Control "no-store";
      add_header X-Frame-Options "SAMEORIGIN";
      expires off;
      try_files $uri $uri/ /get.php?$args;
    }

    add_header X-Frame-Options "SAMEORIGIN";
  }

  location /media/customer/ {
    deny all;
  }

  location /media/downloadable/ {
    deny all;
  }

  location /media/import/ {
    deny all;
  }

  location ~ /media/theme_customization/.*\.xml$ {
    deny all;
  }

  location /errors/ {
    try_files $uri =404;
  }

  location ~ ^/errors/.*\.(xml|phtml)$ {
    deny all;
  }

  location ~ cron\.php {
    deny all;
  }

  location ~ (index|get|static|report|404|503)\.php$ {
    try_files $uri =404;
    fastcgi_pass   127.0.0.1:9000;
    fastcgi_param  PHP_FLAG  "session.auto_start=off \n suhosin.session.cryptua=off";
    fastcgi_param  PHP_VALUE "memory_limit=768M \n max_execution_time=60";
    fastcgi_read_timeout 60s;
    fastcgi_connect_timeout 60s;
    fastcgi_param  MAGE_MODE $MAGE_MODE;
    fastcgi_index  index.php;
    fastcgi_param  SCRIPT_FILENAME  $document_root$fastcgi_script_name;
    include    fastcgi_params;
  }

  # Default magento Nginx config finishes below

  client_max_body_size  20M;
}
If you haven’t dealt with Nginx before, this file might scare you, so let us explain the little bits here, as it will also shed some light on some of Magento’s inner workings. The first lines simply tell Nginx that we are using the default HTTP port, and our domain is
magento2.dev: listen 80;
server_name magento2.dev;
Then we set some environment variables. The first one—
$MAGE_ROOT—holds the path to our codebase. Notice you will need to change the root path to match your username/folder path, wherever you plan to have the source placed on: set $MAGE_ROOT /Users/yourusername/www/magento2dev;
The second variable—
$MAGE_MODE—sets the runtime mode for our shop. As we are developing a module, we will use the developer mode. This allows us to code faster, as we won’t have to compile or deploy static files while developing. The other modes are production and default. The real use for the latter is not yet clear. set $MAGE_MODE developer;
After this variables are set, we define the vhost root path. Notice that we suffix the
$MAGE_ROOT variable with the /pub folder, making only part of our store available to the web. root $MAGE_ROOT/pub;
We then define our index file—the file nginx will load when the requested file doesn’t exist—as index.php. This script,
$MAGE_ROOT/pub/index.php, is the main entry point for customers visiting both the shopping cart and the admin applications. Regardless of the URL requested, index.php will be loaded and the router dispatching process started. index index.php;
Next, we turn off some Nginx features. First, we turn off
autoindex, which would display a file list when you request a folder, but don’t specify a file, and no index is present. Second, we turn off charset, which would allow Nginx to automatically add Charset headers to the response. autoindex off;
charset off;
Next, we define a few security headers:
  add_header 'X-Content-Type-Options' 'nosniff';
  add_header 'X-XSS-Protection' '1; mode=block';
This location,
/, is pointed at our root folder $MAGE_ROOT/pub, and basically redirects any request received to our front controller index.php, together with the request arguments: location / {
try_files $uri $uri/ /index.php?$args;
}
The next portion might be a bit confusing, but it is quite simple. A few lines ago, we defined our root as
$MAGE_ROOT/pub. That is the recommended and more secure setup, as most of the code is not visible from the web. But it is not the only way to set up the web server. Actually, most shared web servers have one default setup, which is to have your web server pointing at your web folder. For those users, the Magento team has made this file ready for those cases, when the root is defined as $MAGE_ROOT with the following snippet:location /pub {
location ~ ^/pub/media/(downloadable|customer|import|theme_customization/.*\.xml) {
deny all;
}
alias $MAGE_ROOT/pub;
add_header X-Frame-Options "SAMEORIGIN";
}
Keep in mind that, whenever possible, it is best if you have your web server pointing at the
$MAGE_ROOT/pubfolder. Your store will be more secure this way.
Next up, we have the static location
$MAGE_ROOT/pub/static. This folder is initially empty and filled up automatically with the modules’ and themes’ static files, such as image files, CSS, JS, etc. Here, we basically define some cache values for the static files and, when the requested file does not exist, redirect it to $MAGE_ROOT/pub/static.php. That script will, among other things, analyze the request and copy or symlink the specified file from the correspondent module or theme, depending on the runtime mode defined. This way, your module’s static files will reside inside our modules’ folder, but will be served directly from the vhost public folder: location /static/ {
if ($MAGE_MODE = "production") {
expires max;
}
location ~* \.(ico|jpg|jpeg|png|gif|svg|js|css|swf|eot|ttf|otf|woff|woff2)$ {
add_header Cache-Control "public";
add_header X-Frame-Options "SAMEORIGIN";
expires +1y;
if (!-f $request_filename) {
rewrite ^/static/(version\d*/)?(.*)$ /static.php?resource=$2 last;
}
}
location ~* \.(zip|gz|gzip|bz2|csv|xml)$ {
add_header Cache-Control "no-store";
add_header X-Frame-Options "SAMEORIGIN";
expires off;
if (!-f $request_filename) {
rewrite ^/static/(version\d*/)?(.*)$ /static.php?resource=$2 last;
}
}
if (!-f $request_filename) {
rewrite ^/static/(version\d*/)?(.*)$ /static.php?resource=$2 last;
}
add_header X-Frame-Options "SAMEORIGIN";
}
Next we deny web access to some restricted folders and files:
  location /media/customer/ {
    deny all;
  }

  location /media/downloadable/ {
    deny all;
  }

  location /media/import/ {
    deny all;
  }

  location ~ /media/theme_customization/.*\.xml$ {
    deny all;
  }

  location /errors/ {
    try_files $uri =404;
  }

  location ~ ^/errors/.*\.(xml|phtml)$ {
    deny all;
  }

  location ~ cron\.php {
    deny all;
  }
And the last bit is where we load up php-fpm and tell it to execute index.php whenever the user hits it:
location ~ (index|get|static|report|404|503)\.php$ {
    try_files $uri =404;
    fastcgi_pass   127.0.0.1:9000;
    fastcgi_param  PHP_FLAG  "session.auto_start=off \n suhosin.session.cryptua=off";
    fastcgi_param  PHP_VALUE "memory_limit=768M \n max_execution_time=60";
    fastcgi_read_timeout 60s;
    fastcgi_connect_timeout 60s;
    fastcgi_param  MAGE_MODE $MAGE_MODE;
    fastcgi_index  index.php;
    fastcgi_param  SCRIPT_FILENAME  $document_root$fastcgi_script_name;
    include    fastcgi_params;
  }
With that out of our way, save the file, and then enable it by typing the following commands:
ln -s /usr/local/etc/nginx/sites-available/magento2dev.conf \
 /usr/local/etc/nginx/sites-enabled/magento2dev.conf
sudo brew services restart nginx
How to Install Magento 2
Okay, at this point your machine meets Magento 2 requirements, missing only the beast itself. Head over to the Magento website and create an account if you still don’t have one. After that, go to the download pageand download the latest version (2.1.5, at the time of writing):
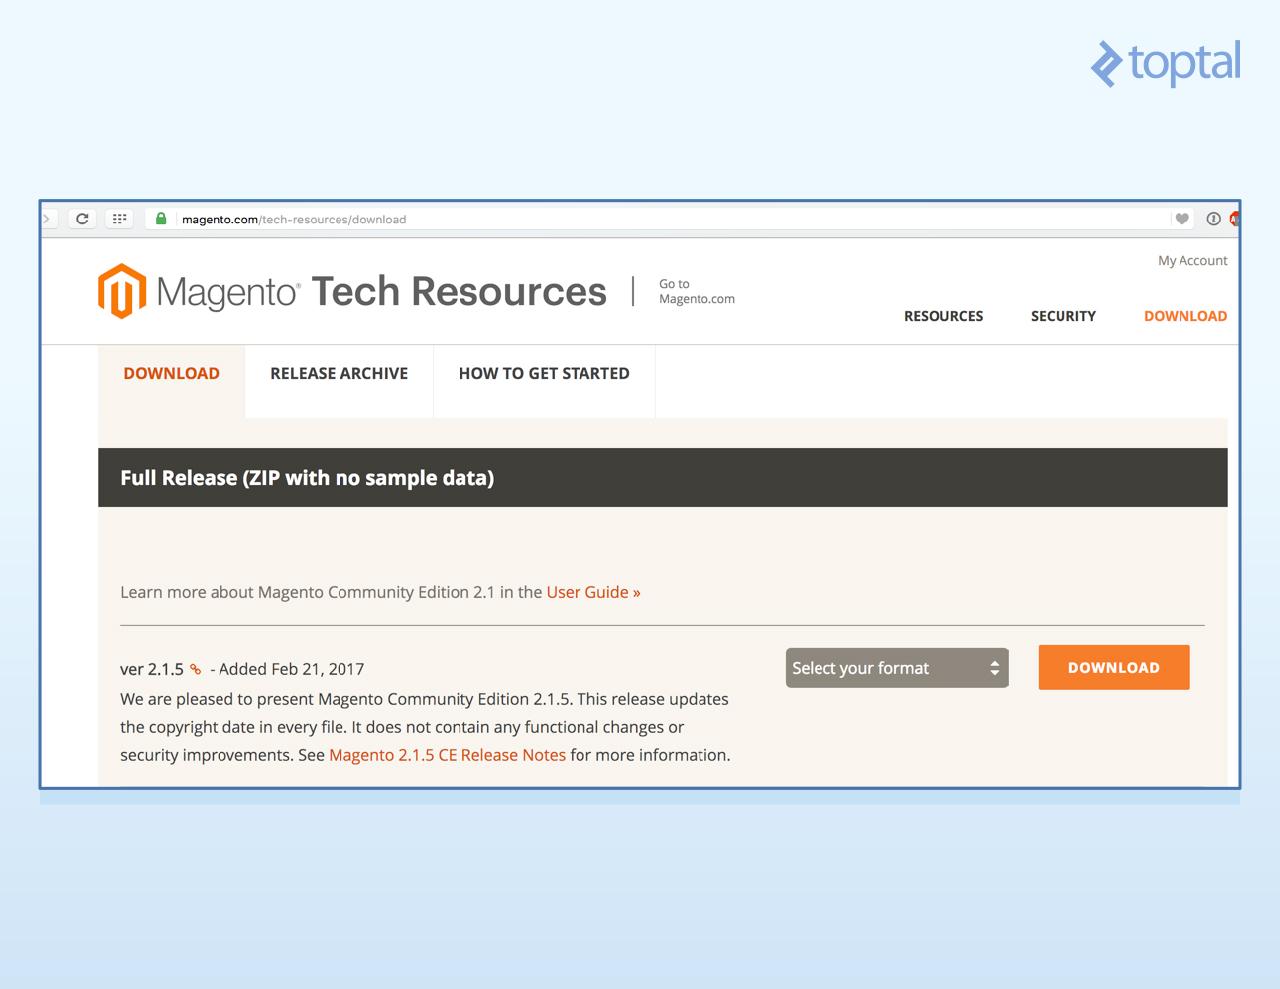
Select the .tar.bz2 format and download it. Then proceed to extract it and set the correct folder and file permissions for Magento 2 to be able to work:
mkdir ~/www/magento2dev
cd ~/www/magento2dev
tar -xjf ~/Downloads/Magento-CE-2.1.5-2017-02-20-05-39-14.tar.bz2
find var vendor pub/static pub/media app/etc -type f -exec chmod u+w {} \;
find var vendor pub/static pub/media app/etc -type d -exec chmod u+w {} \;
chmod u+x bin/magento
Now, to install the database tables and create the needed configuration files, we will run this command from the terminal:
./bin/magento setup:install --base-url=http://magento2.dev/ \
--db-host=127.0.0.1 --db-name=magento2 --db-user=root \
--db-password=123 --admin-firstname=Magento --admin-lastname=User \
--admin-email=user@example.com --admin-user=admin \
--admin-password=admin123 --language=en_US --currency=USD \
--timezone=America/Chicago --use-rewrites=1 --backend-frontname=admin
Remember to change the database name (
db-name), user (db-user) and password (db-password) to match the one you used during MySQL’s installation, and that’s it! This command will install all of Magento 2’s modules, creating the required tables and configuration files. After it is finished, open up your browser and head to http://magento2.dev/. You should see a Magento 2 clean install with the default Luma theme: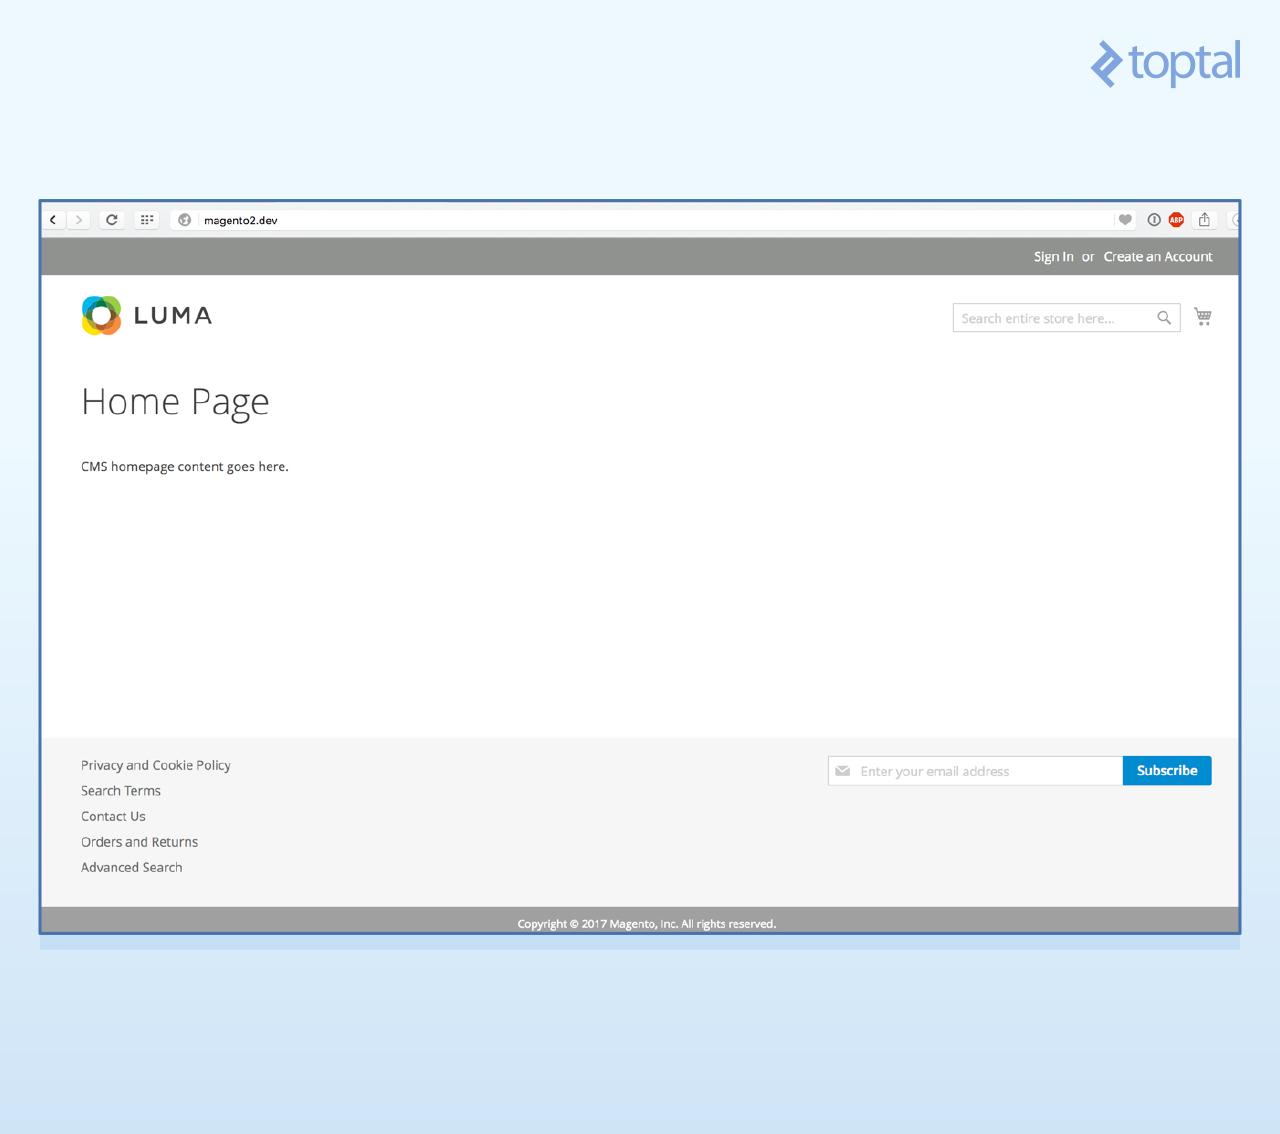
If you head to http://magento2.dev/admin, you should see the Admin application login page:
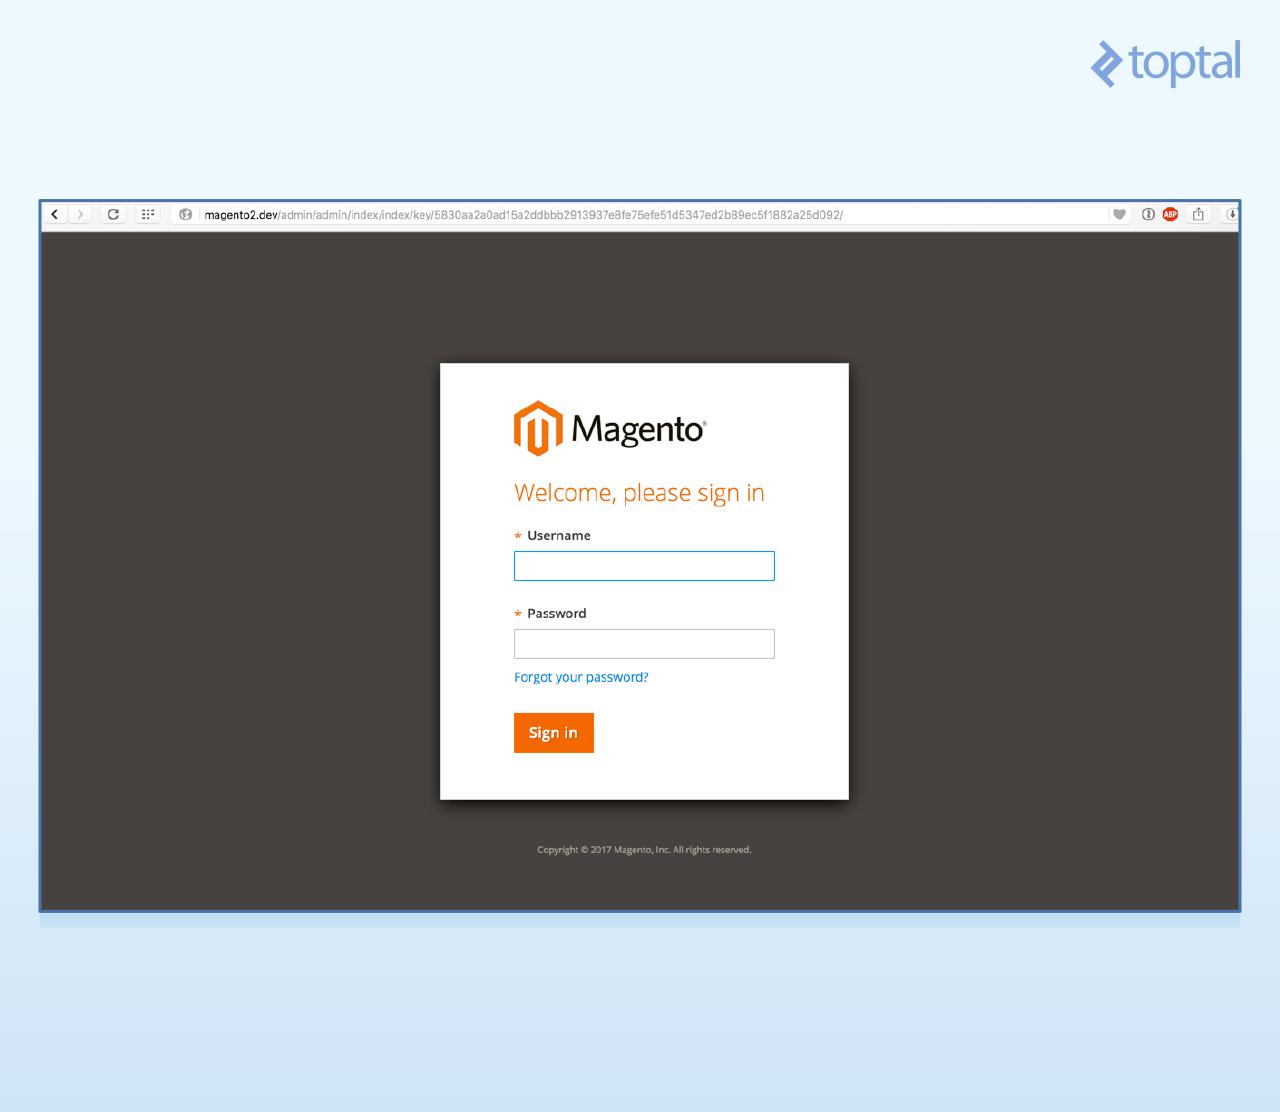
Then use the credentials below to login:
User: admin
Password: admin123
We’re finally ready to start writing our code!
Creating Our First Magento 2 Module
To complete our module, we will have to create the following files, and I will guide you through the whole process. We will need:
- A few boilerplate registration files, to make Magento aware of our Blog module
- One interface file, to define our data contract for the Post
- A Post Model, to represent a Post throughout our code, implementing the Post data interface
- A Post Resource Model, to link the Post Model to the database
- A Post Collection, to retrieve several posts at once from the database with the help of the Resource Model
- Two migration classes, to set up our table schema and content
- Two Actions: one to list all posts and another to show each post individually
- Two each of Blocks, Views, and Layout files: One of each for the list action, and one of each for the view
First, let’s take a quick look at the core source code folder structure, so we can define where to place our code. The way we installed has all of Magento 2 core code, together with all of its dependencies, living inside the composer’s
vendor folder.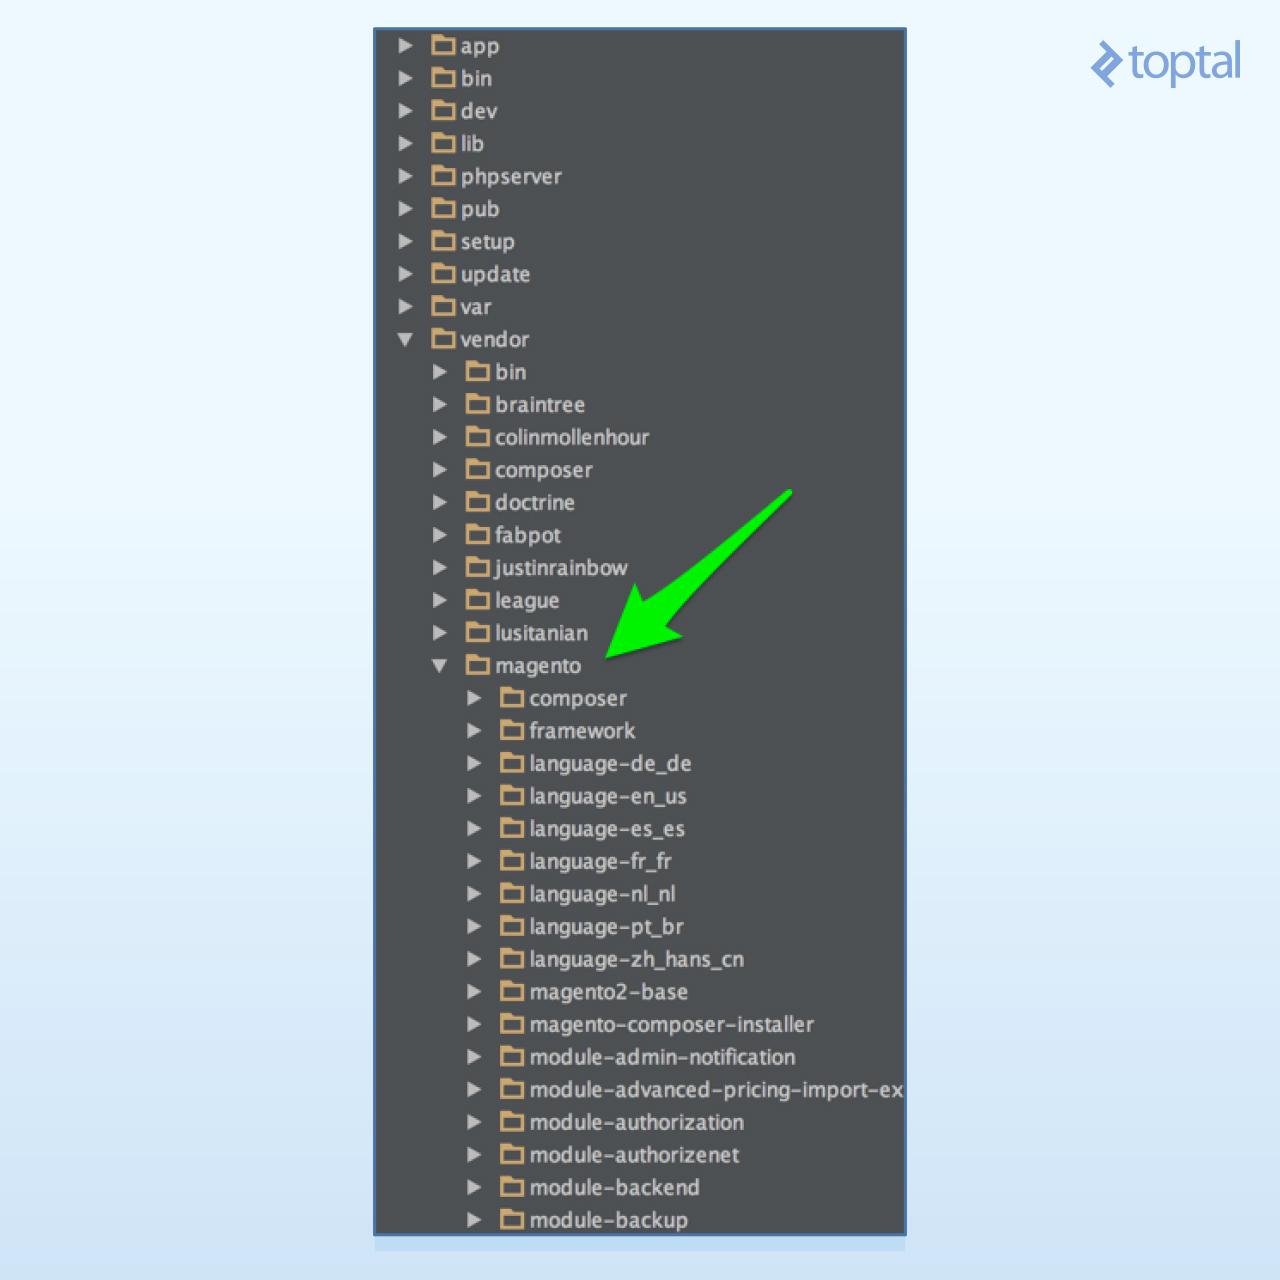
Registering Our Module
We will keep our code in a separate folder,
app/code. Every module’s name is in the form Namespace_ModuleName, and its location on the filesystem must reflect that name, app/code/Namespace/ModuleName for this example. Following that pattern, we will name our module Toptal_Blogand place our files under app/code/Toptal/Blog. Go ahead and create that folder structure.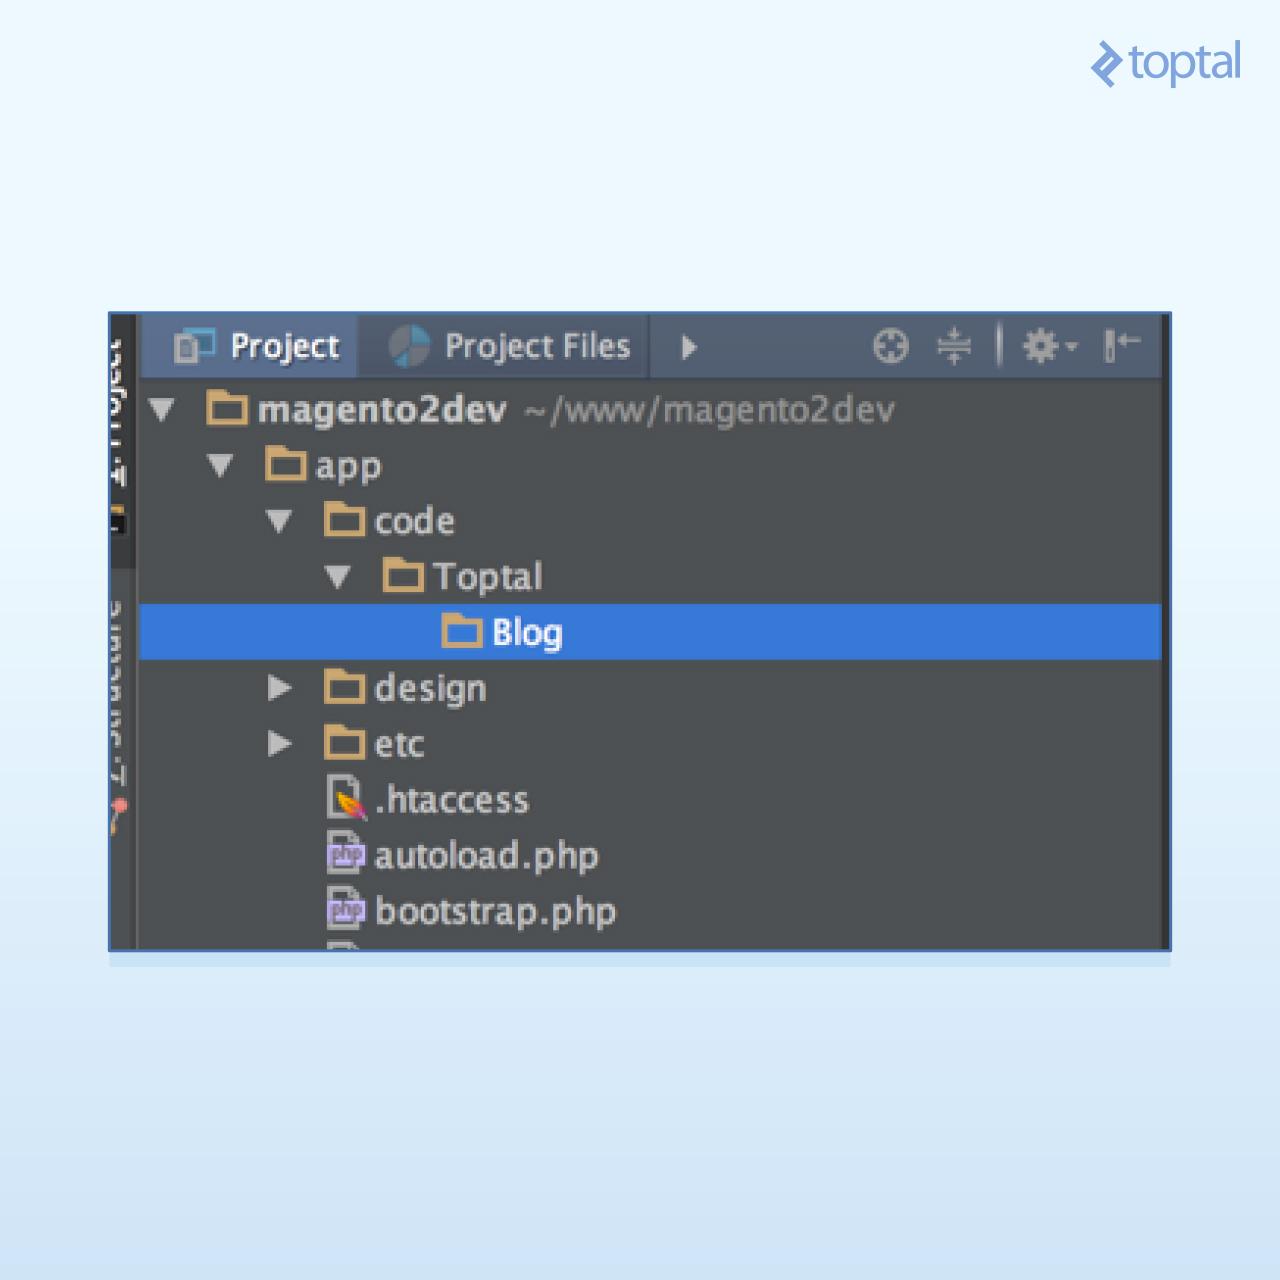
Now, we need to create a few boilerplate files in order to have our module registered with Magento. First, create
app/code/Toptal/Blog/composer.json:{}
This file will be loaded by Composer everytime you run it. Even though we are not actually using Composer with our module, we must create it to keep Composer happy.
Now we will register our module with Magento. Go ahead and create
app/code/Toptal/Blog/registration.php:<?php
\Magento\Framework\Component\ComponentRegistrar::register(
\Magento\Framework\Component\ComponentRegistrar::MODULE,
'Toptal_Blog',
__DIR__
);
Here, we are calling the
register method of the ComponentRegistrar class, sending two parameters: the string 'module', which is the type of component we are registering, and our module’s name, 'Toptal_Blog'. With that information, Magento’s autoloader will be aware of our namespace and will know where to look for our classes and XML files.
One interesting thing to notice here is that we have the type of the component (
MODULE) being sent as a parameter to the \Magento\Framework\Component\ComponentRegistrar::register function. Not only can we register modules, we can register other kinds of components. For instance, themes, external libraries, and language packs are also registered using this same method.
Continuing, let us create our last registration file,
app/code/Toptal/Blog/etc/module.xml:<?xml version="1.0"?>
<config xmlns:xsi="http://www.w3.org/2001/XMLSchema-instance" xsi:noNamespaceSchemaLocation="../../../../../lib/internal/Magento/Framework/Module/etc/module.xsd">
<module name="Toptal_Blog" setup_version="0.1.0">
<sequence>
<module name="Magento_Directory" />
<module name="Magento_Config" />
</sequence>
</module>
</config>
This file holds some very important information about our module. They are:
- The module name is present again, exposing our module name to the Magento configuration.
- The Magento setup version, which will be used by Magento to decide when to run database migration scripts.
- Our module’s dependencies—As we are writing a simple module, we depend only on two Magento core modules:
Magento_DirectoryandMagento_Config.
Now, we have a module which should be recognizable by Magento 2. Let’s check it by using the Magento 2 CLI.
First, we need to disable Magento’s cache. Magento’s cache mechanisms deserve an article dedicated to themselves. For the time being, as we are developing a module and want our changes to be recognized by Magento instantly without the need to clear the cache at all times, we will simply disable it. From the command line, run:
./bin/magento cache:disable
Then let’s see if Magento is already aware of our modifications by looking at the modules’ status. Simply run the following command:
./bin/magento module:status
The result from the last one should be similar to:
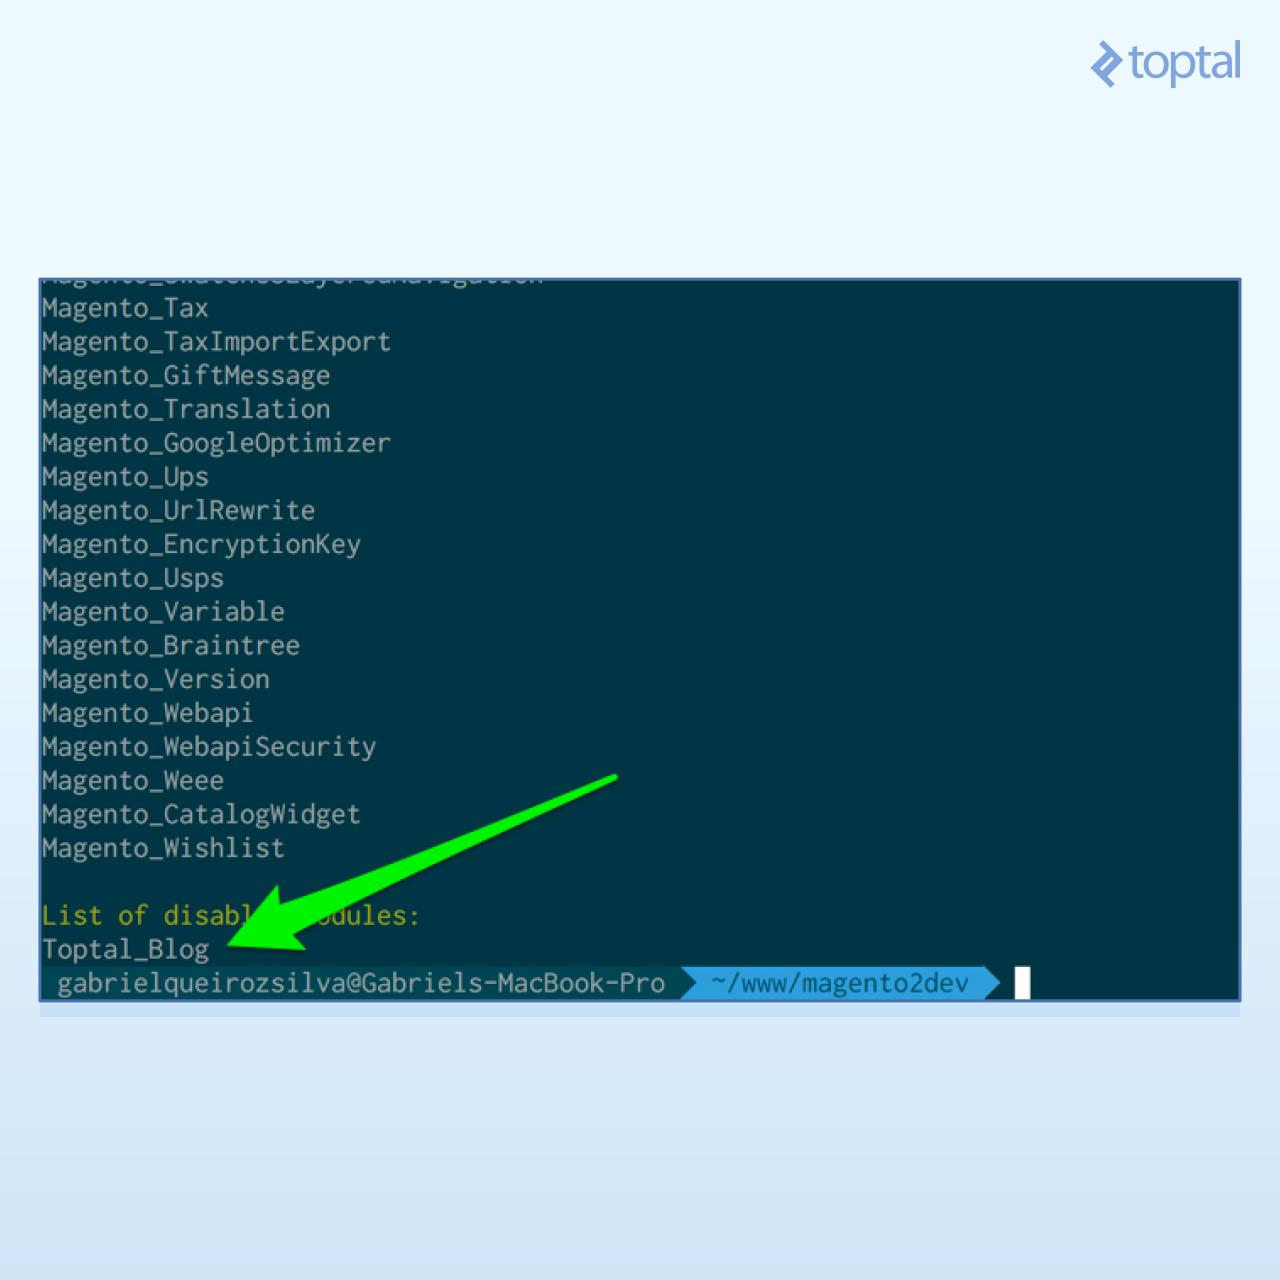
Our module is there, but as the output shows, it is still disabled. To enable it, run:
./bin/magento module:enable Toptal_Blog
That should have done it. To be sure, you can call
module:status again and look for our module’s name in the enabled list: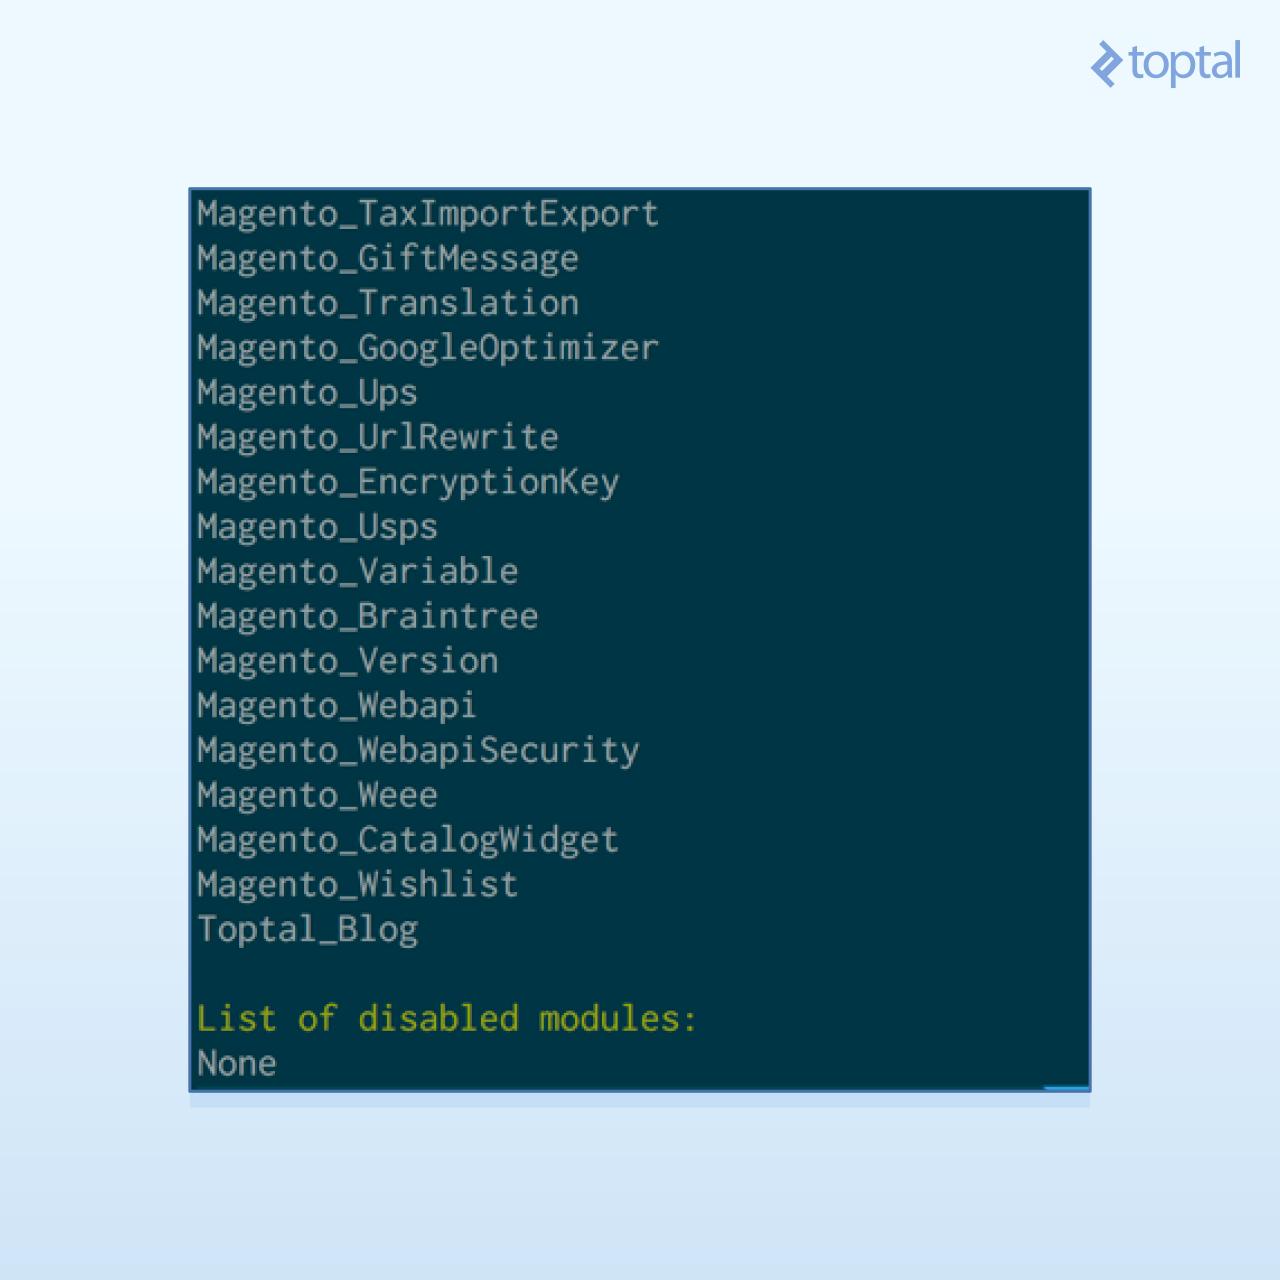
Handling Data Storage
Now that we’ve enabled our module, we need to create the database table which holds our blog posts. This is the schema for the table we want to create:
| Field | Type | Null | Key | Default |
|---|---|---|---|---|
| post_id | int(10) unsigned | NO | PRI | NULL |
| title | text | NO | NULL | |
| content | text | NO | NULL | |
| created_at | timestamp | NO | CURRENT_TIMESTAMP |
We achieve this by creating the
InstallSchema class, which is responsible for managing the installation of our schema migration. The file is located at app/code/Toptal/Blog/Setup/InstallSchema.php and has the following content:<?php
namespace Toptal\Blog\Setup;
use \Magento\Framework\Setup\InstallSchemaInterface;
use \Magento\Framework\Setup\ModuleContextInterface;
use \Magento\Framework\Setup\SchemaSetupInterface;
use \Magento\Framework\DB\Ddl\Table;
/**
* Class InstallSchema
*
* @package Toptal\Blog\Setup
*/
class InstallSchema implements InstallSchemaInterface
{
/**
* Install Blog Posts table
*
* @param SchemaSetupInterface $setup
* @param ModuleContextInterface $context
*/
public function install(SchemaSetupInterface $setup, ModuleContextInterface $context)
{
$setup->startSetup();
$tableName = $setup->getTable('toptal_blog_post');
if ($setup->getConnection()->isTableExists($tableName) != true) {
$table = $setup->getConnection()
->newTable($tableName)
->addColumn(
'post_id',
Table::TYPE_INTEGER,
null,
[
'identity' => true,
'unsigned' => true,
'nullable' => false,
'primary' => true
],
'ID'
)
->addColumn(
'title',
Table::TYPE_TEXT,
null,
['nullable' => false],
'Title'
)
->addColumn(
'content',
Table::TYPE_TEXT,
null,
['nullable' => false],
'Content'
)
->addColumn(
'created_at',
Table::TYPE_TIMESTAMP,
null,
['nullable' => false, 'default' => Table::TIMESTAMP_INIT],
'Created At'
)
->setComment('Toptal Blog - Posts');
$setup->getConnection()->createTable($table);
}
$setup->endSetup();
}
}
If you analyze the
install method, you will notice it simply creates our table and adds its columns one by one.
To determine when to run a schema migration, Magento keeps a table with all of the current setup versions for each module, and whenever a module version changes, its migration classes are initialized. This table is
setup_module, and if you take a look at that table’s contents, you will see that there is no reference to our module so far. So, let us change that. From a terminal, fire the following command:./bin/magento setup:upgrade
That will show you a list of all the modules and its migration scripts that were executed, including ours:
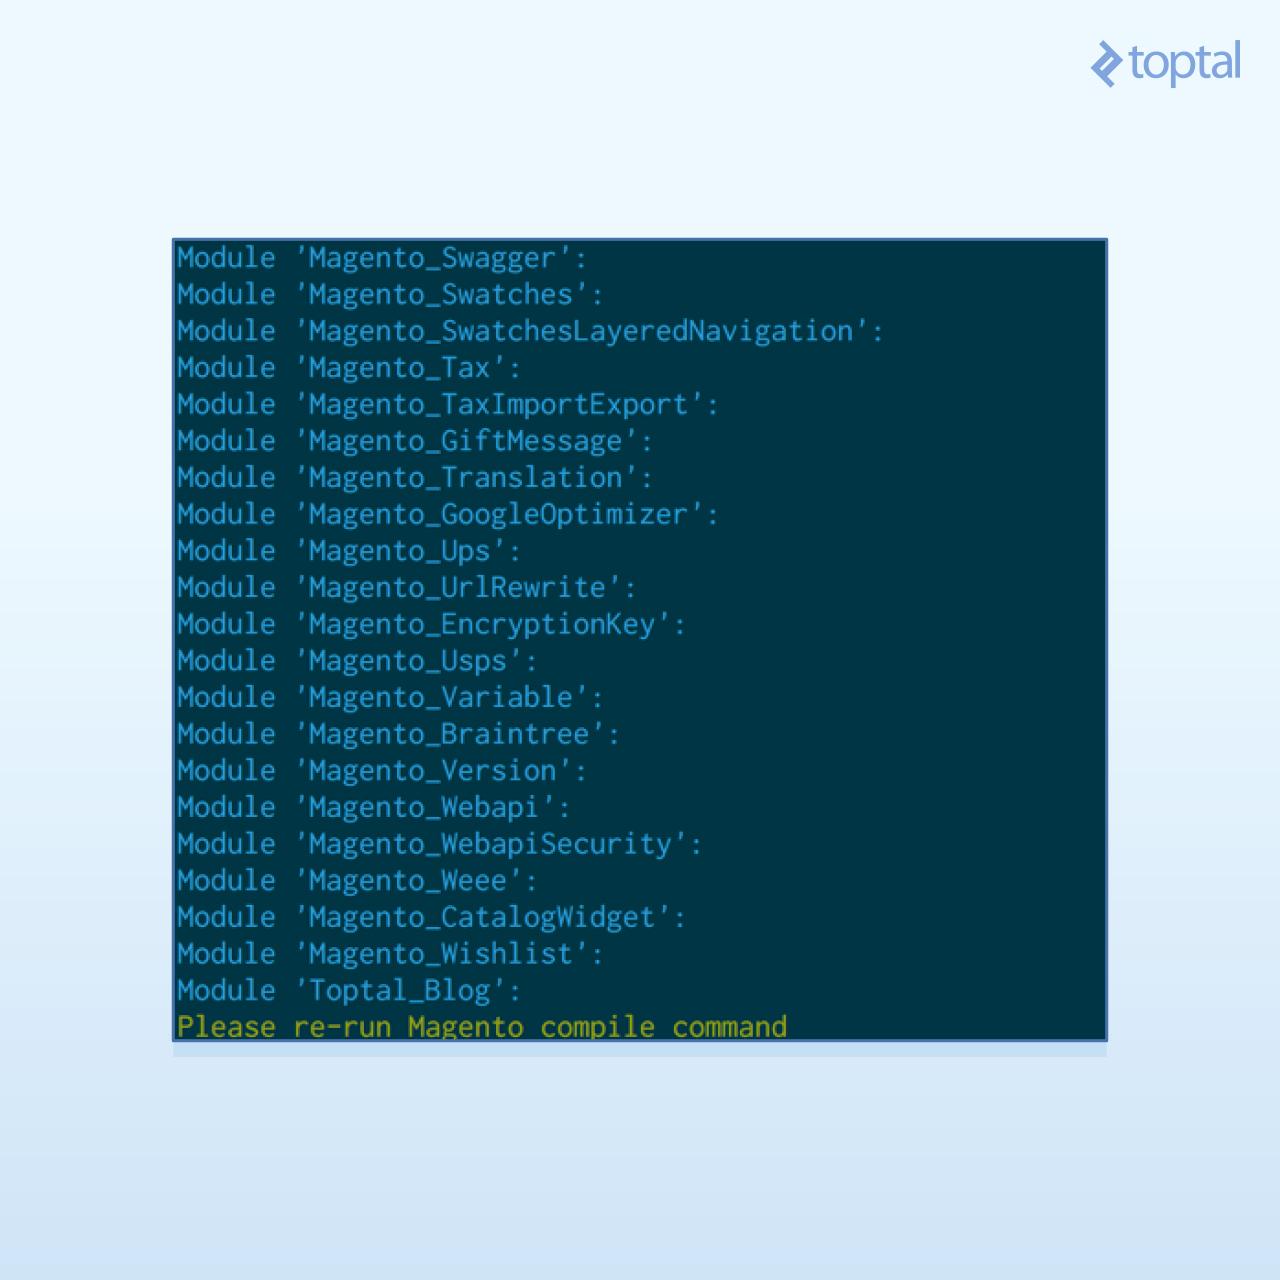
Now, from your MySQL client of preference, you can check if the table has really been created:
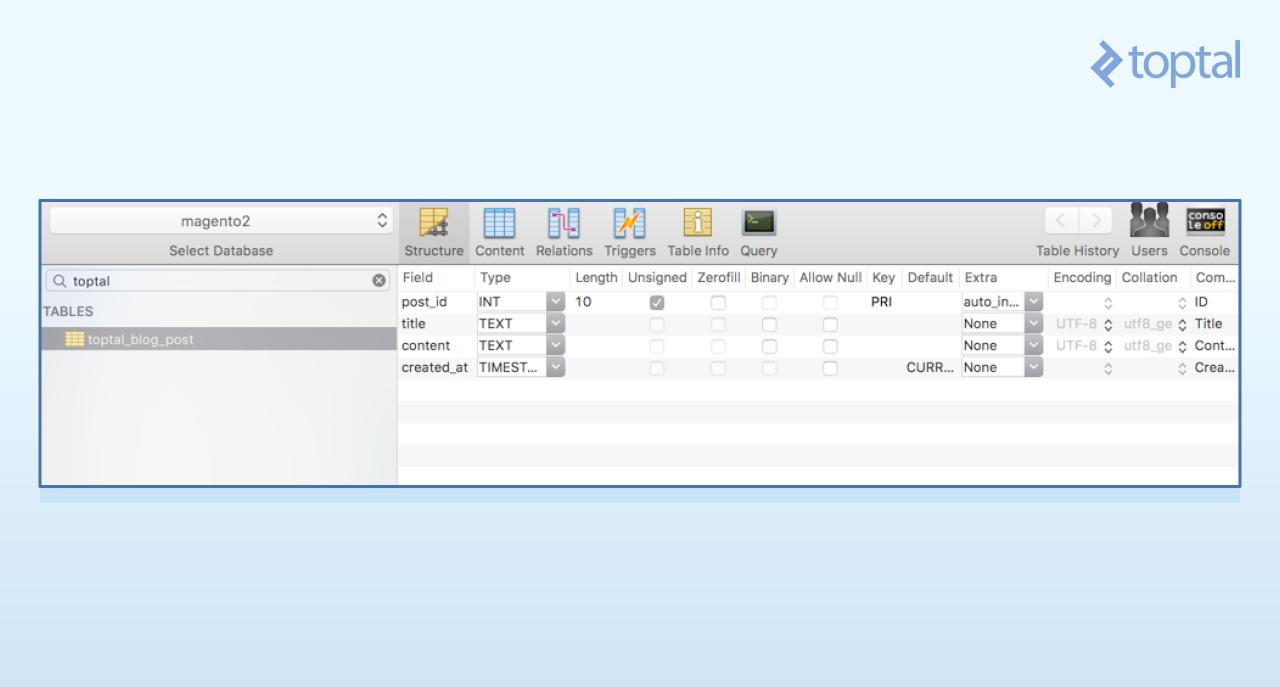
And at the
setup_module table, now there’s a reference to our module, its schema, and data version: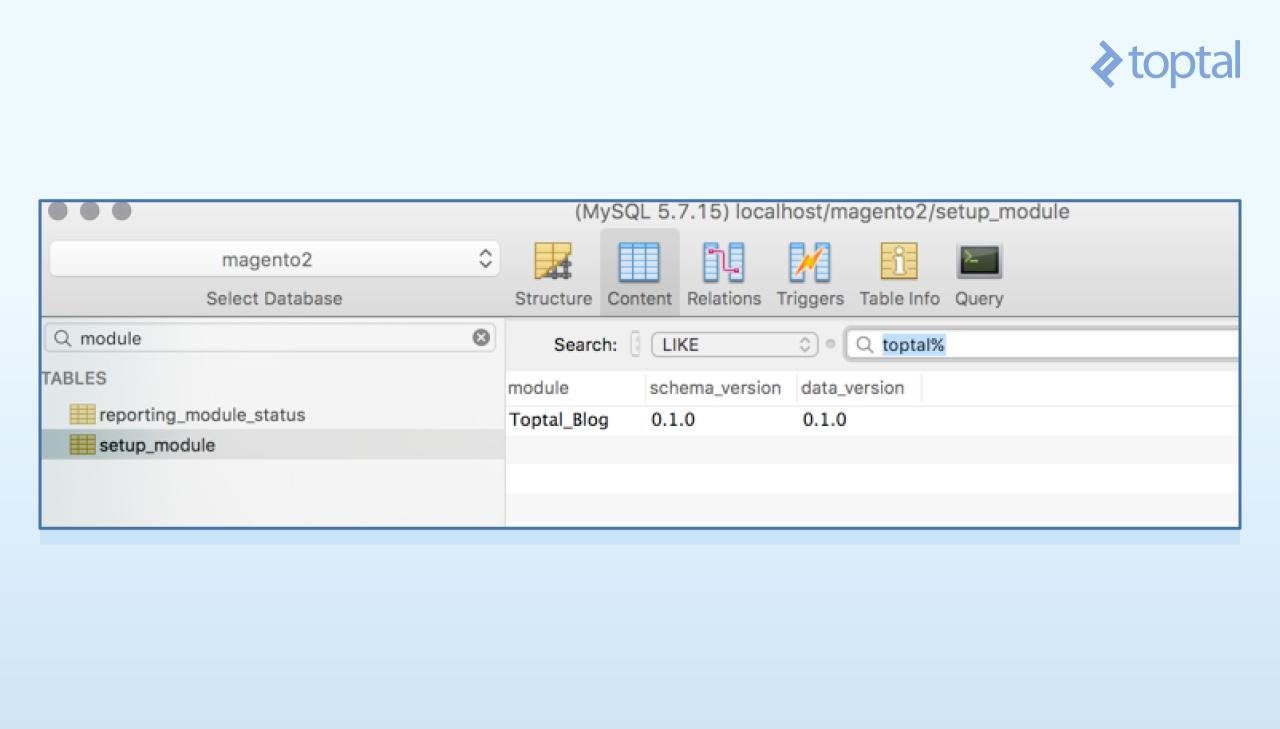
Ok, and what about schema upgrades? Let’s add some posts to that table through an upgrade to show you how to do that. First, bump the
setup_version on our etc/module.xml file: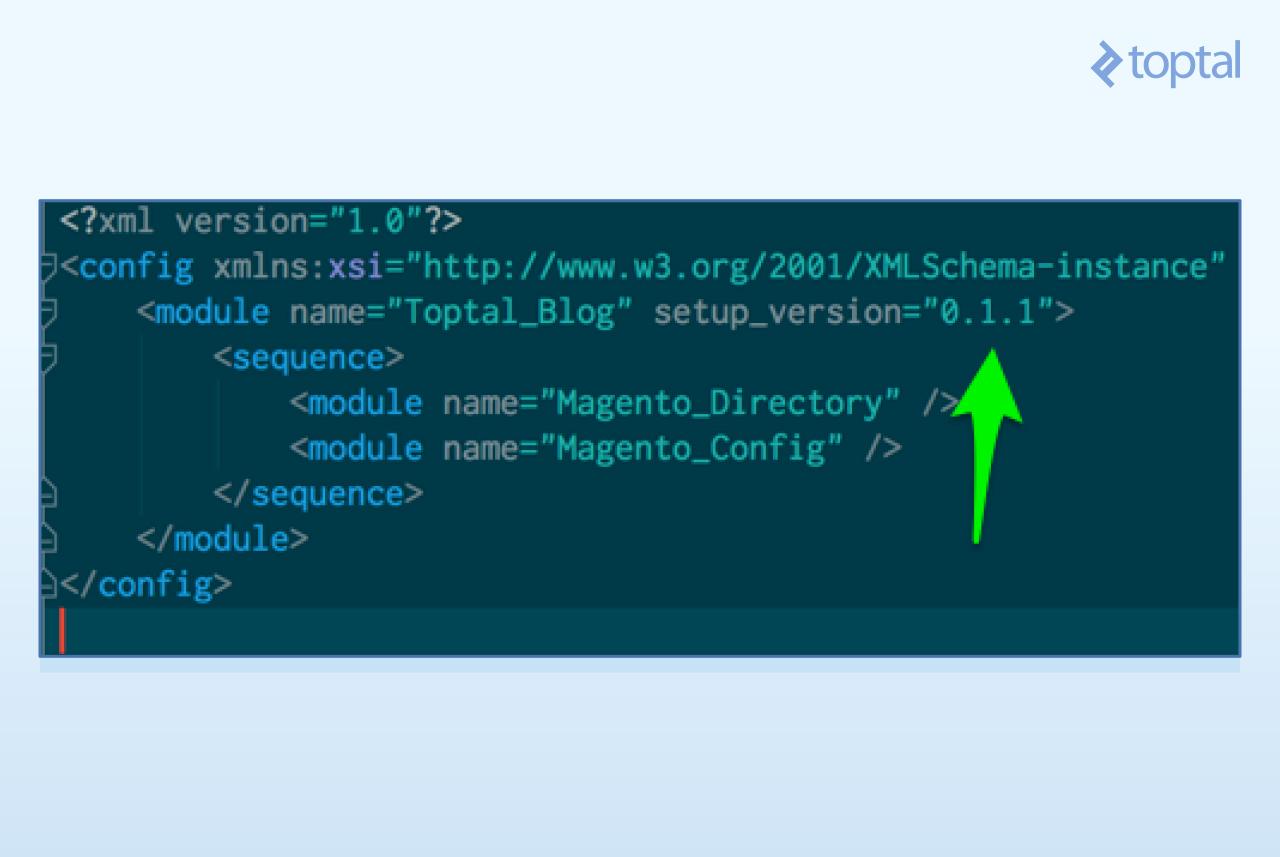
Now we create our
app/code/Toptal/Blog/Setup/UpgradeData.php file, which is responsible for the data (not schema) migrations:<?php
namespace Toptal\Blog\Setup;
use \Magento\Framework\Setup\UpgradeDataInterface;
use \Magento\Framework\Setup\ModuleContextInterface;
use \Magento\Framework\Setup\ModuleDataSetupInterface;
/**
* Class UpgradeData
*
* @package Toptal\Blog\Setup
*/
class UpgradeData implements UpgradeDataInterface
{
/**
* Creates sample blog posts
*
* @param ModuleDataSetupInterface $setup
* @param ModuleContextInterface $context
* @return void
*/
public function upgrade(ModuleDataSetupInterface $setup, ModuleContextInterface $context)
{
$setup->startSetup();
        if ($context->getVersion()
            && version_compare($context->getVersion(), '0.1.1') < 0
        ) {
$tableName = $setup->getTable('toptal_blog_post');
$data = [
[
'title' => 'Post 1 Title',
'content' => 'Content of the first post.',
],
[
'title' => 'Post 2 Title',
'content' => 'Content of the second post.',
],
];
$setup
->getConnection()
->insertMultiple($tableName, $data);
}
$setup->endSetup();
}
}
You can see that it is very similar to our Install class. The only difference is that it implements an
UpgradeDataInterface instead of InstallSchemaInterface, and the main method is called upgrade. With this method, you check for the current module’s installed version and, when smaller than yours, fire up the changes you need to get done. In our example, we are checking if the current version is smaller than 0.1.1 in the following line using the version_compare function: if ($context->getVersion()
&& version_compare($context->getVersion(), '0.1.1') < 0
) {
The
$context->getVersion() call will return 0.1.0 when the setup:upgrade CLI command is called for the first time. Then the sample data is loaded to the database, and our version is bumped to 0.1.1. To get this running, go ahead and fire a setup:upgrade:./bin/magento setup:upgrade
And then check the results at the posts table:
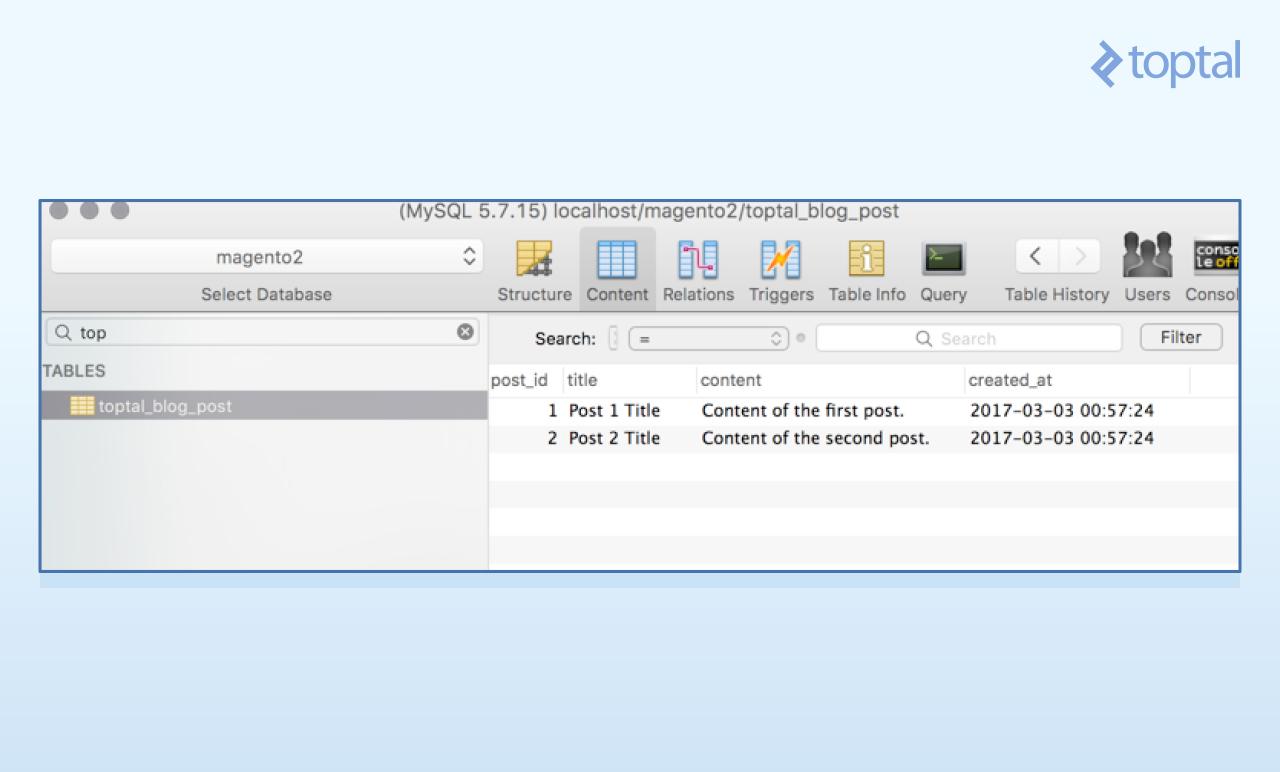
And at the
setup_module table: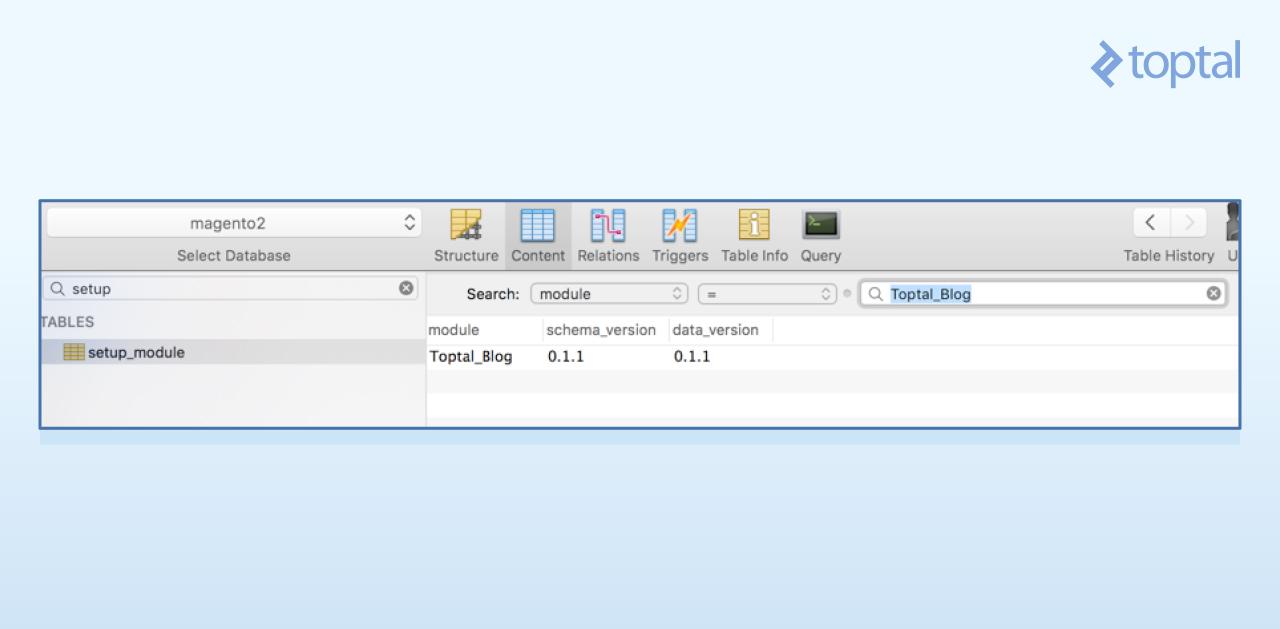
Notice that, even though we added data to our table using the migration process, it would have been possible to change the schema as well. The process is the same; you would only use the
UpgradeSchemaInterface instead of the UpgradeDataInterface.Defining the Model for Posts
Moving on, if you remember our architecture overview, our next building block would be the blog post ResourceModel. The Resource Model is very simple, and simply states the table for which the Model will “connect” to, together with what its primary key is. We will create our ResourceModel at
app/code/Toptal/Blog/Model/ResourceModel/Post.php with the following contents:<?php
namespace Toptal\Blog\Model\ResourceModel;
use \Magento\Framework\Model\ResourceModel\Db\AbstractDb;
class Post extends AbstractDb
{
/**
* Post Abstract Resource Constructor
* @return void
*/
protected function _construct()
{
$this->_init('toptal_blog_post', 'post_id');
}
}
All of the ResourceModel operations, unless you need something different from the usual CRUD operations, are handled by the
AbstractDb parent class.
We will also need another ResourceModel, a Collection. The Collection will be responsible for querying the database for multiple posts using our ResourceModel and delivering back a series of Models instantiated and filled up with info. We create the file
app/code/Toptal/Blog/Model/ResourceModel/Post/Collection.php with the following content:<?php
namespace Toptal\Blog\Model\ResourceModel\Post;
use \Magento\Framework\Model\ResourceModel\Db\Collection\AbstractCollection;
class Collection extends AbstractCollection
{
/**
* Remittance File Collection Constructor
* @return void
*/
protected function _construct()
{
$this->_init('Toptal\Blog\Model\Post', 'Toptal\Blog\Model\ResourceModel\Post');
}
}
Notice that in the constructor we simply mention the Model, which will represent the post entity throughout our code, and the ResourceModel, which will fetch the info at the database.
The missing piece for this layer is the Post Model itself. The model should hold all the attributes we have defined in our schema, along with any business logic you might need. Following Magento 2’s pattern, we need to create a Data Interface that our model will extend from. We place the interface at
app/code/Toptal/Blog/Api/Data/PostInterface.php, and it should hold the table’s fields names, along with the methods for accessing them:<?php
namespace Toptal\Blog\Api\Data;
interface PostInterface
{
/**#@+
* Constants for keys of data array. Identical to the name of the getter in snake case
*/
const POST_ID = 'post_id';
const TITLE = 'title';
const CONTENT = 'content';
const CREATED_AT = 'created_at';
/**#@-*/
/**
* Get Title
*
* @return string|null
*/
public function getTitle();
/**
* Get Content
*
* @return string|null
*/
public function getContent();
/**
* Get Created At
*
* @return string|null
*/
public function getCreatedAt();
/**
* Get ID
*
* @return int|null
*/
public function getId();
/**
* Set Title
*
* @param string $title
* @return $this
*/
public function setTitle($title);
/**
* Set Content
*
* @param string $content
* @return $this
*/
public function setContent($content);
/**
* Set Crated At
*
* @param int $createdAt
* @return $this
*/
public function setCreatedAt($createdAt);
/**
* Set ID
*
* @param int $id
* @return $this
*/
public function setId($id);
}
Now to the model’s implementation, at
app/code/Toptal/Blog/Model/Post.php. We will create the methods defined at the interface. We will also specify a cache tag through the CACHE_TAG constant and, at the constructor, we will specify the ResourceModel that will be responsible for the database access for our model.<?php
namespace Toptal\Blog\Model;
use \Magento\Framework\Model\AbstractModel;
use \Magento\Framework\DataObject\IdentityInterface;
use \Toptal\Blog\Api\Data\PostInterface;
/**
* Class File
* @package Toptal\Blog\Model
* @SuppressWarnings(PHPMD.CouplingBetweenObjects)
*/
class Post extends AbstractModel implements PostInterface, IdentityInterface
{
/**
* Cache tag
*/
const CACHE_TAG = 'toptal_blog_post';
/**
* Post Initialization
* @return void
*/
protected function _construct()
{
$this->_init('Toptal\Blog\Model\ResourceModel\Post');
}
/**
* Get Title
*
* @return string|null
*/
public function getTitle()
{
return $this->getData(self::TITLE);
}
/**
* Get Content
*
* @return string|null
*/
public function getContent()
{
return $this->getData(self::CONTENT);
}
/**
* Get Created At
*
* @return string|null
*/
public function getCreatedAt()
{
return $this->getData(self::CREATED_AT);
}
/**
* Get ID
*
* @return int|null
*/
public function getId()
{
return $this->getData(self::POST_ID);
}
/**
* Return identities
* @return string[]
*/
public function getIdentities()
{
return [self::CACHE_TAG . '_' . $this->getId()];
}
/**
* Set Title
*
* @param string $title
* @return $this
*/
public function setTitle($title)
{
return $this->setData(self::TITLE, $title);
}
/**
* Set Content
*
* @param string $content
* @return $this
*/
public function setContent($content)
{
return $this->setData(self::CONTENT, $content);
}
/**
* Set Created At
*
* @param string $createdAt
* @return $this
*/
public function setCreatedAt($createdAt)
{
return $this->setData(self::CREATED_AT, $createdAt);
}
/**
* Set ID
*
* @param int $id
* @return $this
*/
public function setId($id)
{
return $this->setData(self::POST_ID, $id);
}
}
Creating Views
Now we are moving one layer up, and will start the implementation of our ViewModel and Controller. To define a route in the front-end (shopping cart) application, we need to create the file
app/code/Toptal/Blog/etc/frontend/routes.xml with the following contents:<?xml version="1.0"?>
<config xmlns:xsi="http://www.w3.org/2001/XMLSchema-instance" xsi:noNamespaceSchemaLocation="urn:magento:framework:App/etc/routes.xsd">
<router id="standard">
<route id="blog" frontName="blog">
<module name="Toptal_Blog"/>
</route>
</router>
</config>
List of Posts at the Index Page
Here, we are basically telling Magento that our module,
Toptal_Blog, will be responsible for responding to routes under http://magento2.dev/blog (notice the frontName attribute of the route). Next up is the action, at app/code/Toptal/Blog/Controller/Index/Index.php:<?php
namespace Toptal\Blog\Controller\Index;
use \Magento\Framework\App\Action\Action;
use \Magento\Framework\View\Result\PageFactory;
use \Magento\Framework\View\Result\Page;
use \Magento\Framework\App\Action\Context;
use \Magento\Framework\Exception\LocalizedException;
class Index extends Action
{
/**
* @var PageFactory
*/
protected $resultPageFactory;
/**
* @param Context $context
* @param PageFactory $resultPageFactory
*
* @codeCoverageIgnore
* @SuppressWarnings(PHPMD.ExcessiveParameterList)
*/
public function __construct(
Context $context,
PageFactory $resultPageFactory
) {
parent::__construct(
$context
);
$this->resultPageFactory = $resultPageFactory;
}
/**
* Prints the blog from informed order id
* @return Page
* @throws LocalizedException
*/
public function execute()
{
$resultPage = $this->resultPageFactory->create();
return $resultPage;
}
}
Our action is defining two methods. Let us take a closer look at them:
- The constructor method simply sends the
$contextparameter to its parent method, and sets the$resultPageFactoryparameter to an attribute for later use. At this point it is useful to know the Dependency Injection design pattern, as that is what is happening here. In Magento 2’s case we have automatic dependency injection. This means that whenever a class instantiation occurs, Magento will automatically try to instantiate all of the class constructor parameters (dependencies) and inject it for you as constructor parameters. It identifies which classes to instantiate for each parameter by inspecting the type hints, in this caseContextandPageFactory. - The
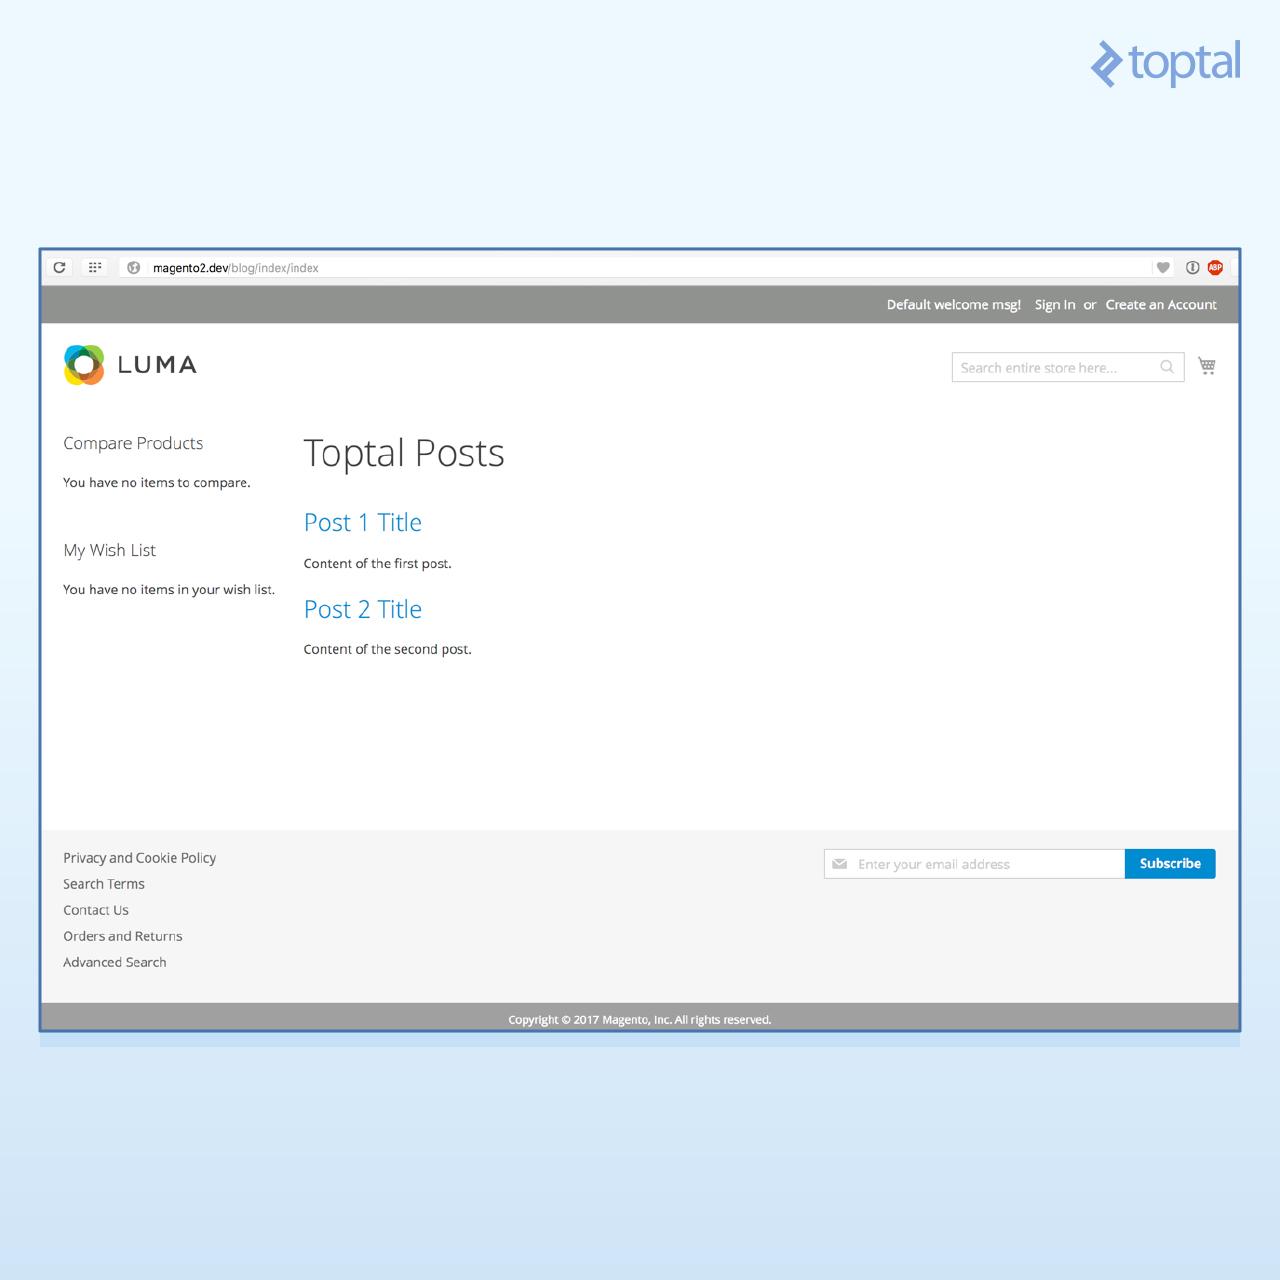
executemethod is responsible for the action execution itself. In our case, we are simply telling Magento to render its layout by returning aMagento\Framework\View\Result\Pageobject. This will trigger the layout rendering process, which we will create in a bit.
Now you should see a blank page at the url http://magento2.dev/blog/index/index. We still need to define the layout structure for that route, and its corresponding Block (our ViewModel) and the template file which will present the data to our user.
The layout structure for the front-end application is defined under
view/frontend/layout, and the file name must reflect our route. As our route is blog/index/index, the layout file for that route will be app/code/Toptal/Blog/view/frontend/layout/blog_index_index.xml:<?xml version="1.0"?>
<page xmlns:xsi="http://www.w3.org/2001/XMLSchema-instance" layout="2columns-left" xsi:noNamespaceSchemaLocation="urn:magento:framework:View/Layout/etc/page_configuration.xsd">
<body>
<referenceContainer name="content">
<block class="Toptal\Blog\Block\Posts"
name="posts.list"
template="Toptal_Blog::post/list.phtml" />
</referenceContainer>
</body>
</page>
Here, we must define three very important structures in the Magento layout structure: Blocks, Containers, and Templates.
- Blocks are the ViewModel part of our MVVM architecture, which was explained in earlier sections. They are the building blocks of our template structure.
- Containers contain and output Blocks. They hold blocks together in nice hierarchical structures, and help in making things make sense when the layout for a page is being processed.
- Templates are PHMTL (mixed HTML and PHP) files used by a special type of block in Magento. You can make calls to methods of a
$blockvariable from within a template. The variable is always defined in the template context. You will be invoking your Block’s methods by doing so, and thus allowing you to pull information from the ViewModel layer to the actual presentation.
With that extra information at hand, we can analyze the XML layout structure above. This layout structure is basically telling Magento that, when a request is made to the
blog/index/index route, a Block of the type Toptal\Blog\Block\Posts is to be added to the content container, and the template which will be used to render it is Toptal_blog::post/list.phtml.
This leads us to the creation of our two remaining files. Our Block, located at
app/code/Toptal/Blog/Block/Posts.php:<?php
namespace Toptal\Blog\Block;
use \Magento\Framework\View\Element\Template;
use \Magento\Framework\View\Element\Template\Context;
use \Toptal\Blog\Model\ResourceModel\Post\Collection as PostCollection;
use \Toptal\Blog\Model\ResourceModel\Post\CollectionFactory as PostCollectionFactory;
use \Toptal\Blog\Model\Post;
class Posts extends Template
{
/**
* CollectionFactory
* @var null|CollectionFactory
*/
protected $_postCollectionFactory = null;
/**
* Constructor
*
* @param Context $context
* @param PostCollectionFactory $postCollectionFactory
* @param array $data
*/
public function __construct(
Context $context,
PostCollectionFactory $postCollectionFactory,
array $data = []
) {
$this->_postCollectionFactory = $postCollectionFactory;
parent::__construct($context, $data);
}
/**
* @return Post[]
*/
public function getPosts()
{
/** @var PostCollection $postCollection */
$postCollection = $this->_postCollectionFactory->create();
$postCollection->addFieldToSelect('*')->load();
return $postCollection->getItems();
}
/**
* For a given post, returns its url
* @param Post $post
* @return string
*/
public function getPostUrl(
Post $post
) {
return '/blog/post/view/id/' . $post->getId();
}
}
This class is rather simple, and its objective is solely to load the posts to be shown, and provide a
getPostUrlmethod to the template. There are some things to notice though.
If you remember, we have not defined a
Toptal\Blog\Model\ResourceModel\Post\CollectionFactory class. We only defined the Toptal\Blog\Model\ResourceModel\Post\Collection. So how is this even working? For every class you define in your module, Magento 2 will automatically create a Factory for you. Factories have two methods: create, which will return a new instance for each call, and get, which will always return the same instance whenever called—used to implement the Singleton pattern.
The third parameter of our Block,
$data, is an optional array. As it is optional and does not have a type hint, it will not be injected by the automatic injection system. It is important to notice that optional constructor parameters must always be positioned last in the parameters. For instance, the constructor of the Magento\Framework\View\Element\Template, our parent class, has these parameters: public function __construct(
Template\Context $context,
array $data = []
) {
...
As we wanted to add our
CollectionFactory to the constructor parameters after extending the Template class, we had to do it before the optional parameter, otherwise the injection would not work: public function __construct(
Context $context,
PostCollectionFactory $postCollectionFactory,
array $data = []
) {
...
At the
getPosts method, which will be accessed later by our template, we simply call the create method from the PostCollectionFactory, which will return us a fresh PostCollection and allow us to fetch our posts from the database and send it to our response.
And to finish this route’s layout, here is our our PHTML template,
app/code/Toptal/Blog/view/frontend/templates/post/list.phtml:<?php /** @var Toptal\Blog\Block\Posts $block */ ?>
<h1>Toptal Posts</h1>
<?php foreach($block->getPosts() as $post): ?>
<?php /** @var Toptal\Blog\Model\Post */ ?>
<h2><a href="<?php echo $block->getPostUrl($post);?>"><?php echo $post->getTitle(); ?></a></h2>
<p><?php echo $post->getContent(); ?></p>
<?php endforeach; ?>
Notice that here we can see the View layer accessing our ModelView (
$block->getPosts()) which in turn uses a ResourceModel (the collection) to fetch our models (Toptal\Blog\Model\Post) from the database. In every template, whenever you want to access its block’s methods, there will be a $block variable defined and waiting for your calls.
Now you should be able to see the posts list by simply hitting our route again.
Viewing Individual Posts
Now, if you click on a post title, you will get a 404, so let’s fix that. With all of our structure in place, this becomes quite simple. We will need only to create the following:
- A new action, responsible for handling requests to the
blog/post/viewroute - A Block to render the post
- A PHTML template, responsible for the view itself
- A layout file for the blog/post/view route, putting these last pieces together.
Our new action is quite simple. It will simply receive the parameter
id from the request and register it at Magento core registry, a central repository for information that is available throughout a single request cycle. By doing this, we will make the ID available to the block later on. The file should be located at app/code/Toptal/Blog/Controller/Post/View.php and these are its contents:<?php
namespace Toptal\Blog\Controller\Post;
use \Magento\Framework\App\Action\Action;
use \Magento\Framework\View\Result\PageFactory;
use \Magento\Framework\View\Result\Page;
use \Magento\Framework\App\Action\Context;
use \Magento\Framework\Exception\LocalizedException;
use \Magento\Framework\Registry;
class View extends Action
{
const REGISTRY_KEY_POST_ID = 'toptal_blog_post_id';
/**
* Core registry
* @var Registry
*/
protected $_coreRegistry;
/**
* @var PageFactory
*/
protected $_resultPageFactory;
/**
* @param Context $context
* @param Registry $coreRegistry
* @param PageFactory $resultPageFactory
*
* @codeCoverageIgnore
* @SuppressWarnings(PHPMD.ExcessiveParameterList)
*/
public function __construct(
Context $context,
Registry $coreRegistry,
PageFactory $resultPageFactory
) {
parent::__construct(
$context
);
$this->_coreRegistry = $coreRegistry;
$this->_resultPageFactory = $resultPageFactory;
}
/**
* Saves the blog id to the register and renders the page
* @return Page
* @throws LocalizedException
*/
public function execute()
{
$this->_coreRegistry->register(self::REGISTRY_KEY_POST_ID, (int) $this->_request->getParam('id'));
$resultPage = $this->_resultPageFactory->create();
return $resultPage;
}
}
Notice that we have added the
$coreRegistry parameter to our __construct, and saved it as an attribute for later use. At the execute method, we retrieve the id parameter from the request, and register it. We alse use a class constant, self::REGISTRY_KEY_POST_ID as a key to the register, and we will use this same constant at our block to refer to the id in the registry.
Let us create the block, at
app/code/Toptal/Blog/Block/View.php with the following contents:<?php
namespace Toptal\Blog\Block;
use \Magento\Framework\Exception\LocalizedException;
use \Magento\Framework\View\Element\Template;
use \Magento\Framework\View\Element\Template\Context;
use \Magento\Framework\Registry;
use \Toptal\Blog\Model\Post;
use \Toptal\Blog\Model\PostFactory;
use \Toptal\Blog\Controller\Post\View as ViewAction;
class View extends Template
{
/**
* Core registry
* @var Registry
*/
protected $_coreRegistry;
/**
* Post
* @var null|Post
*/
protected $_post = null;
/**
* PostFactory
* @var null|PostFactory
*/
protected $_postFactory = null;
/**
* Constructor
* @param Context $context
* @param Registry $coreRegistry
* @param PostFactory $postCollectionFactory
* @param array $data
*/
public function __construct(
Context $context,
Registry $coreRegistry,
PostFactory $postFactory,
array $data = []
) {
$this->_postFactory = $postFactory;
$this->_coreRegistry = $coreRegistry;
parent::__construct($context, $data);
}
/**
* Lazy loads the requested post
* @return Post
* @throws LocalizedException
*/
public function getPost()
{
if ($this->_post === null) {
/** @var Post $post */
$post = $this->_postFactory->create();
$post->load($this->_getPostId());
if (!$post->getId()) {
throw new LocalizedException(__('Post not found'));
}
$this->_post = $post;
}
return $this->_post;
}
/**
* Retrieves the post id from the registry
* @return int
*/
protected function _getPostId()
{
return (int) $this->_coreRegistry->registry(
ViewAction::REGISTRY_KEY_POST_ID
);
}
}
At the view block, we define a protected method
_getPostId, which will simply retrieve the post ID from the core registry. The public getPost method will in turn lazy load the post and throw an exception if the post does not exist. Throwing an exception here will make Magento show its default error screen, which might not be the best solution in such a case, but we will keep it this way for the sake of simplicity.
On to our PHTML template. Add
app/code/Toptal/Blog/view/frontend/templates/post/view.phtml with the following contents:<?php /** @var Toptal\Blog\Block\View $block */ ?>
<h1><?php echo $block->getPost()->getTitle(); ?></h1>
<p><?php echo $block->getPost()->getContent(); ?></p>
Nice and simple, simply accessing the View block
getPost method we created earlier.
And, to put it all together, we create a layout file for our new route at
app/code/Toptal/Blog/view/frontend/layout/blog_post_view.xml with the following content:<?xml version="1.0"?>
<page xmlns:xsi="http://www.w3.org/2001/XMLSchema-instance" layout="2columns-left" xsi:noNamespaceSchemaLocation="urn:magento:framework:View/Layout/etc/page_configuration.xsd">
<body>
<referenceContainer name="content">
<block class="Toptal\Blog\Block\View"
name="post.view"
template="Toptal_Blog::post/view.phtml" />
</referenceContainer>
</body>
</page>
This does the same thing we did before. It simply adds
Toptal\Blog\Block\View to the content container, with Toptal_Blog::post/view.phtml as the associated template.
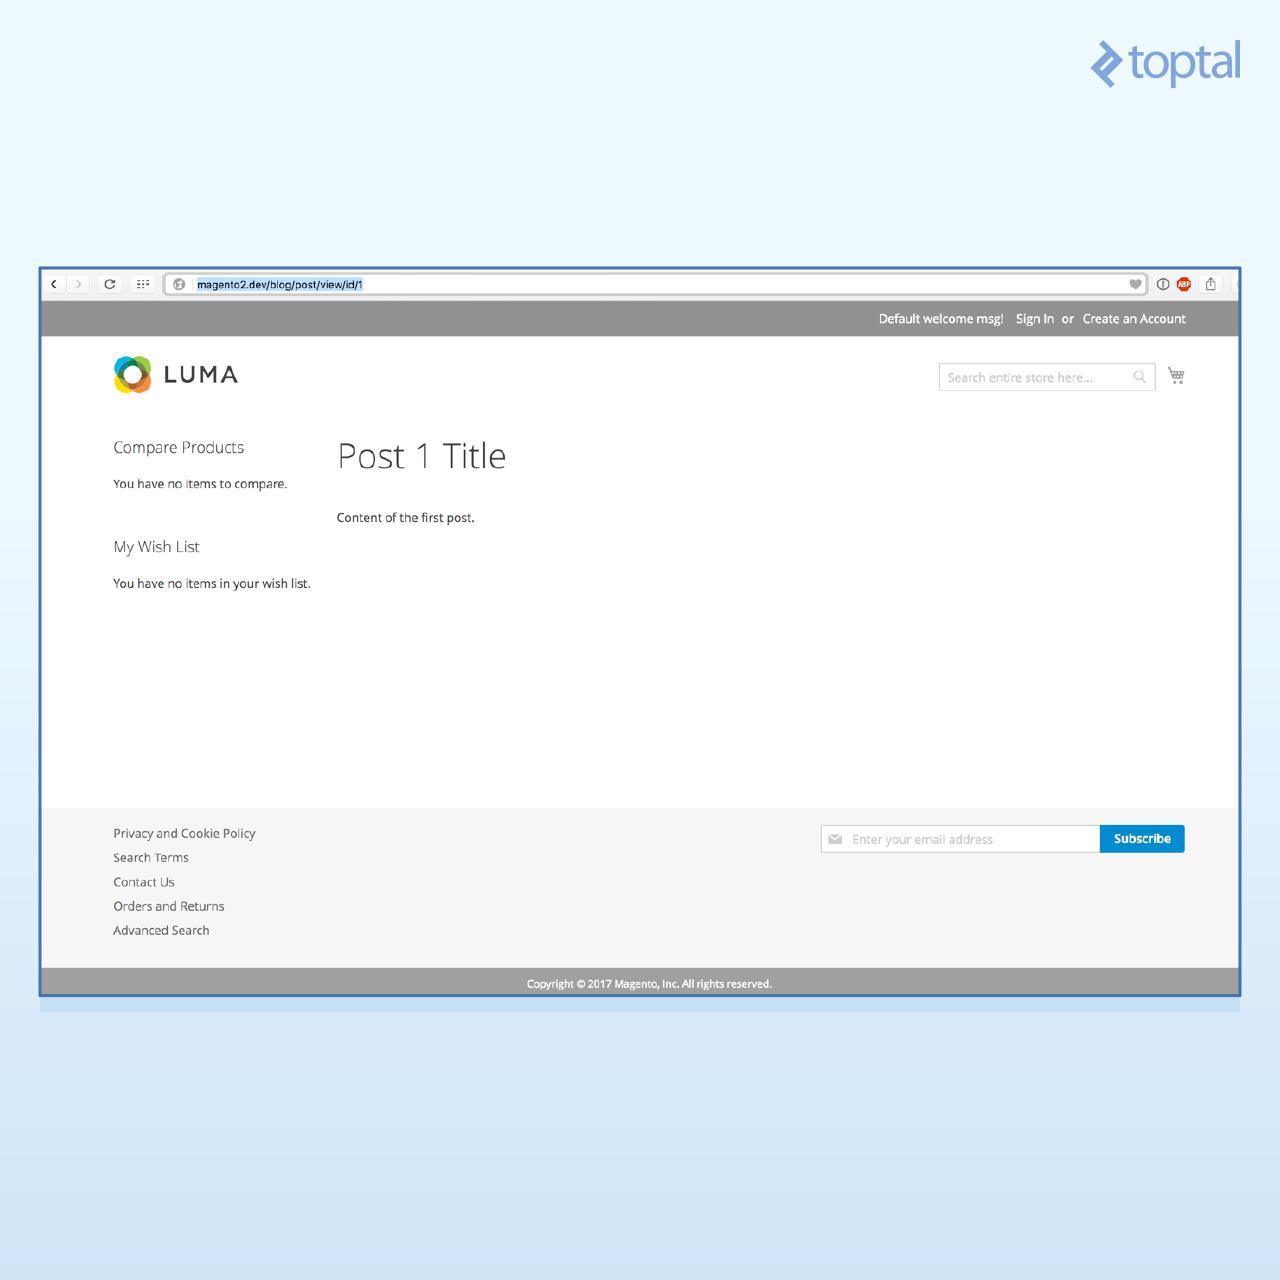
To see it in action, simply direct your browser to http://magento2.dev/blog/post/view/id/1 to successfully load a post. You should see a screen such as the one below:
And as you can see, after creating our initial structure, it is really simple to add features to the platform, and most of our initial code is reused in the process.
In case you want to quickly test the module, here is the total result of our work.
Where to Go from Here
If you have followed me up until here, congratulations! I am positive you are quite close to becoming a Magento 2 developer. We have developed a pretty advanced Magento 2 custom module, and even though it is simple in its features, a lot of ground has been covered.
Some things were left out from this article, for the sake of simplicity. To name a few:
- Admin edit forms and grids to manage our blog content
- Blogs categories, tags and comments
- Repositories and a few service contracts we could have established
- Packaging modules up as Magento 2 extensions
In any case, here are some useful links where you can deepen your knowledge even more:
- Alan Storm Blog on Magento 2 — Alan Storm has probably the most didactic content when it comes to learning Magento.
- Alan Kent’s Blog
- Magento documentation: The Magento 2 Dev Docs
I provided you with a comprehensive introduction to all relevant aspects of how to create a module in Magento 2, and a few additional resources should you need them. Now it’s up to you to get coding, or head down to the comments if you’d like to weigh in.
Contents from www.toptal.com
Comments
Post a Comment